

ラボ・マニュアル
The latest pdf version of a lab manual is attached here and it will be updated regularly.
Contents
1.1 General lab safety and work rules
1.3 Group jobs and last person's checklist
1.4 Group meetings and individual meetings
4.1 General rules for chemical storage
4.2 Detailed procedure for registering chemicals in CMS
4.4 Aqua Regia, strong acid and base waste: handling and disposal
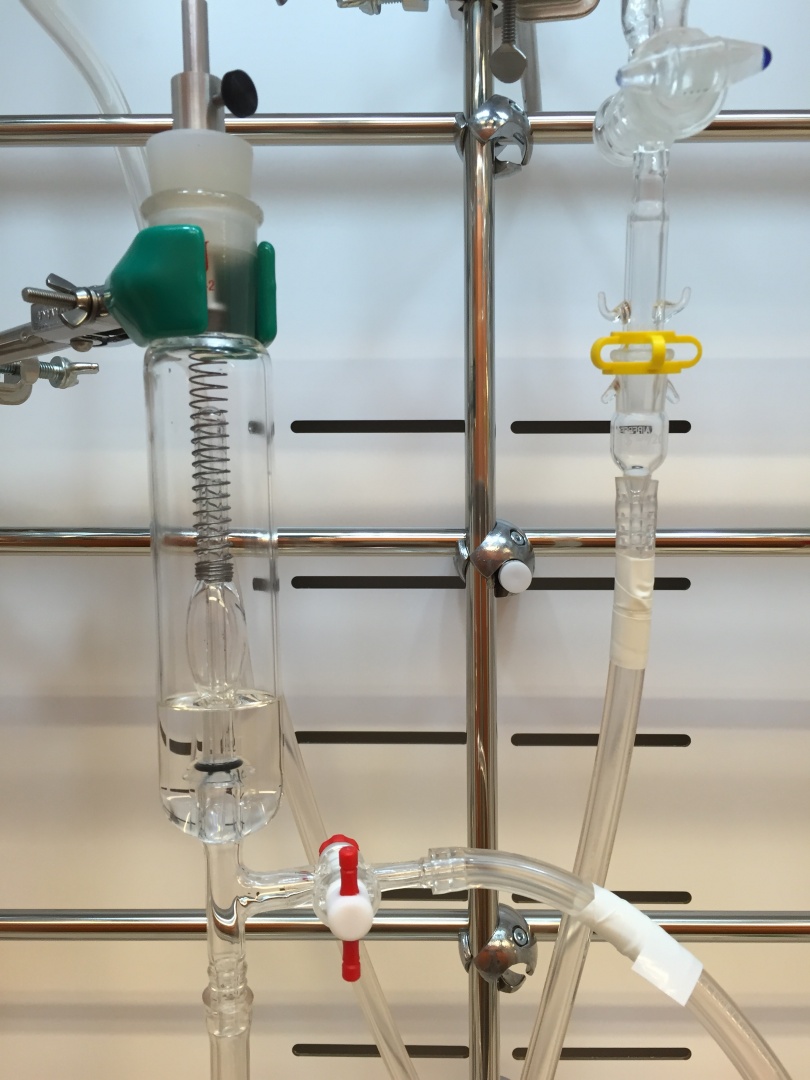
5. Solvent Purification System (SPS)
1. General rules
1.1 General lab safety and work rules
- Wear safety goggles when working in synthetic lab
- Never perform organolithium reaction or any other potentially dangerous reaction when you are alone in the lab!
- Wear gloves when working with chemicals, but take the glove(s) off when touching computer keyboard, doorknobs, or when going to an office area.
- Label all chemicals, vials with samples and flasks in your workplace: draw structure or put chemical name on a label when possible, not just a compound ID
- Leave notebook in your bench notebook drawer or on the bench, so that if the reaction goes wrong when you are away, people can easily find the corresponding record in your notebook.
- Don’t store glassware and spatulas in the sinks and in the oven. The sink should be empty by the end of the day. After washing glassware, put it on a drying rack or in the oven to dry, when put everything back to the corresponding drawer. This can be easily accomplished by washing glassware at the end of the day and putting on a metal tray, then putting the tray in the oven. In the morning, take the tray out to cool and half an hour later put the glassware away.
- Do not put microsyringes or Young NMR tubes in the oven. Here is a more detailed list of things you shouldn't put in the oven.
- For reflux over long periods of time, use our circulation system with water pump (not tap water); cool down with ice if necessary. Secure hoses with clamps.
- Clean up day is first Monday of every month. During clean up day, clean not only your bench and fume hood, but also organize and clean up in the synthetic lab and in the glovebox room and inside the box. Remove all dry unused glassware from the ovens and put it back in the drawers; make sure there is no orphan glassware left in the oven or in the sink. CHECK THE FRIDGE AND EMPTY WATER TRAY if it contains water.
- When you are not immediately doing an experiment in the fume hood, the hood sashes should not be open by more than 30 cm. Lower the sashes to a minimum at the end of the day when finished working in the hood. Other fumehoods in the lab may not operate at 100% capacity if too many hoods are open. Also, energy use by a fully open fumehood is very considerable, and approaches that of an average apartment.
1.2 Lab Notebook
Leave 6 empty pages in front of every new notebook and fill them out regularly as a Table of contents as you start using the notebook with page numbers and description of experiment on each page (“Preparation of (SMe2)2PtCl2 ... p. 1”). Also, use one or two pages to draw chemical structures corresponding to each ID code or abbreviation you use for each compound in your notebook. For every new synthetic experiment, write down the following in the notebook:
- today’s date;
- reaction equation;
- molecular weight and amounts of each reagent;
- literature reference if relevant;
- assign a specific code to each new compound with your initials and ID number.
- detailed procedure for preparation, catalytic reaction or reactivity tests
Describe synthetic procedure in great detail, so that even an undergraduate student with very little synthetic experience can repeat it. Include description of glassware used (size and type of flask – 500 mL round bottom, condensers etc) and even drawing of apparatus if the procedure is non-standard. Describe how you add reagent (with a syringe or a funnel; in several portions, dropwise, slowly; at what temperature, stirred vigorously, non-stirred). Describe color changes. Indicate length of time if warm up reaction and bath temperature. Indicate volume of solvent used for extraction and washings; what drying reagent is used. Mention volumes of solvents for recrystallization. For X-ray crystals, describe method of crystallization and solvents. For isolated product: indicate color, appearance of product (powder; oil; liquid); boiling point of fraction and pressure if distillation is used. Include characterization by mass spec and NMR if applicable and include file names and location of NMR spectra and mass spectra (printed or files). Calculate % yield.
1.3 Group jobs and last person's checklist
Group jobs table is attached and the group jobs may be reshuffled every few months. Responsibility of the primary person is to take care of assigned piece of equipment, including: training for new users; repair/contacting vendor about repair or replacement parts; making sure the instrument is in a good condition. For example, if you are a primary person for a rotovap and you notice the rotovap is not clean, first, try to find the last user and ask to clean it. However, if the last user cannot be identified, the primary person will have to take care of that. The secondary person can be contacted in case primary person is not available.
Last person’s checklist (attached). Last person to leave the lab should go through all items on a checklist. For some items, last person just performs a control check, but if, for example, you are the last to use GC (or glovebox), it’s your responsibility to switch it off or set to Eco mode before leaving.
1.4 Group meetings and individual meetings
Group meeting are held every week and are of two types that are alternating: research group meetings and literature meetings. Meetings usually last for 1 hour. For research group meeting, give a presentation about your progress since last meeting. Include: brief introduction and goals; results and discussion; summary/conclusion; future plans. After meeting, we go over all slides again from the beginning for further discussion and questions. After group meeting, upload our presentation on group google drive. For literature meeting, pick 1 or 2 papers from recent literature relevant to our research and prepare a presentation. Send pdf’s of the paper by email 2-3 days before meeting or share via google drive.
Individual meetings are held with each group members every week in PI’s office. Everyone needs to prepare a weekly report in Word or Powerpoint format. The report should include schemes of reactions done over past week, yields, characterization (mass spec m/z expected and observed, NMR with actual spectra). Upload weekly report on group's google drive folder.
2. Glovebox
Before you start using glovebox, put your name in a glovebox logbook and write down today’s date and start time (“Time in”). When finished, write down “time out” time and add any comments if necessary. The gloveboxes should be switched to Eco mode overnight. Antechambers are left under static vacuum when not in use.
Using small antechamber:
- Refill antechamber with inert gas by turning a valve to “refill” position), then switch valve to “closed” position
- Put materials you want to transfer on a sliding tray. Glassware should be clean, oven dried and hot straight from the oven (use aluminum trays and heat-resistant gloves to transfer). Transfer liquids in tightly sealed containers that withstand evacuation/refill (resistant to internal pressure during evacuation). To transfer solids, cover container with aluminum foil with a few holes in it.
- Evacuate for at least 60 seconds (after vacuum gauge is at the minimum); refill. Repeat evacuate/refill cycles 3 times.
- In the last cycle, refill antechamber, then move valve to “closed” position. Open antechamber from inside, transfer materials from sliding tray and close the antechamber lid as soon as you finished using it.
- When finished using small antechamber, leave it under static vacuum (evacuate then turn valve to “close” position)
CAUTION
- Do not leave valve in “refill” position when outer lid is open to air. Close the valve.
- Make sure you don’t open inner lid when outer lid is also open
- Do not attempt to open antechamber lid when it’s under vacuum – check pressure on a gauge
- Never leave any containers containing liquids in the evacuated antechamber overnight, even if they appear to be tightly sealed in a Teflon-valve Schlenk flask. If there is a small leak, all solvents will evaporate and contaminate pump oil. In this case, oil should be changed as soon as possible.
- Dry water-absorbing materials (corks, Kimwipes, cotton) under vacuum overnight before introducing to the box or pre-dry in the oven at 40-50 deg when applicable.
Using big antechamber
Use big antechamber for transferring anything that doesn’t fit into small antechamber (big reagent bottles, large size glassware, large Schlenk solvent storage flasks, large amounts of plasticware etc). Make 3 cycles with evacuation time of 15 minutes. The evacuation/refill are controlled from touch panel.
Using solvents inside the box
- When use chlorinated solvents (chloroform, dichloromethane), phosphines, metal carbonyls, alcohols or other reagents that are harmful to the catalyst (copper), turn the circulation off before opening. Try to minimize period of time when you work with circulation off, so prepare all other reagents in advance. After finishing working, open balance doors, and purge the glovebox. Purge until O2 and H2O leven go below 0.5 ppm for N2-filled gloveboxes.
- For Argon glovebox, try to minimize frequency of use of reagents harmful for the catalyst, so that you need to perform purge less frequently and for shorter period of time (once a day, 5 minutes if only non-halogenated solvents were used) compared to N2-filled glovebox; it will help to save argon, which is more expensive than nitrogen. When purging, monitor argon pressure. For basic operation or when use only small amounts (=< 5 mL) of chlorinated solvents, do not purge unless O2/H2O levels are abnormal.
3. Rotovap
- Rotovap trap is cooled by isopropyl alcohol/dry ice.
- Fill the trap with dry ice to the top. Start adding first small pieces of dry ice slowly until cold, then fill up with small/medium size chunks of dry ice to the very top of the trap. If only very small amount of isopropyl alcohols is left in the trap, add more. Put the plastic lid on. Remove previous solvent from trap if you see any. If you do not, a lot of dry ice will be used up cooling this solvent as it evaporates under reduced pressure as well. Also, you are not likely to know the identity of mystery solvent in the trap and it could be low boiling DCM which is bad for the vacuum.
- Attache the bump trap between rotovap and the flask; secure with a clip.
- It’s good practice to clip the flask you put on the rotovap, as in the absence of vacuum it can fall into the water bath.
- During operation, regularly check that the trap is still filled with dry ice and cold. If necessary, add more dry ice.
- If the solvent is low boiling, such as ether or dichloromethane, do not set the pressure too low. Keep it at ~190 at the lowest, preferably higher. Otherwise, these solvents can get into the pump and ruin it. It is also possible to use an ice bath for the solvent trap in this case.
- After finishing, turn off the pump, turn off water bath heating, and remove the solvent from the trap
- If ground joints, bump traps or any other parts are dirty, clean them. The rotovap should be immediately ready to use by the next user.
4. Chemical storage and waste
4.1 General rules for chemical storage
- Every new chemical arriving to the lab should be registered in CMS (https://cms.oist.jp) and labeled with a barcode and our own color-coded hazardous class/storage location label (see below for more details)
- Chemicals should be segregated according to hazardous class (deleterious, poisonous, and non-hazardous). Chemicals that belong to different classes cannot be stored together (do not put deleterious together with non-hazardous or with poisonous). At the same time, use common chemical sense: acids and bases can be both deleterious, but should be stored separately. Perchloric acid should be stored separately from all other acids. Acetic acid and other organic acids should be stored separately from oxidants (sulfuric acid, perchloric acid, nitric acid). Alkali metals, hydrides are stored separately, away from anything they can react with (water, acids, chlorinated solvents). Some chemicals are not labeled as deleterious or poisonous by the law, but clearly are more dangerous than many of the controlled chemicals. Use common sense when receiving OsO4 or chlorophosphines and store accordingly.
- Any storage place where deleterious or poisonous chemicals are stored, should be locked with a key when not in use. Storage place should be labeled with “deleterious” and “hazardous” red labels (request from Safety section for free)
- Chemicals should be stored in separate trays inside flammable cabinet and refrigerator. Individual bottles should be separated by “walls” in chemical drawers under the hoods. In all cases, put yellow plastic net over all glass bottles to protect in case of earthquake (available for free from Safety section)
- For all chemicals for which “Used amount management” in CMS is “mandatory”, you need to record the amounts used in the CMS system every time you use it. For chemicals where “Used amount management” in CMS is “optional”, it’s not required. You can see “Used amount management” when registering chemicals in CMS and by looking at our color-coded round labels: white round label is for “optional”, and any non-white labels are for “mandatory”, including: deleterious (red), poisonous (green), flammable (yellow) (see below for more detail).
- Storage location code should be written on each bottle on the round label (see table of codes in the attached file and read detailed procedure below; also posted in the lab). Return bottle to the same location according to a label.
- When chemicals are finished, register disposal immediately through CMS system and cross out the barcode on the bottle after that.
4.2 Detailed procedure for registering chemicals in CMS
CMS: https://cms.oist.jp
When entering chemicals into the system, put two labels on the bottle:
- Barcode (vertically if possible)
- Round label corresponding to hazardous class; write down storage location code!
Color-coded round labels:
- DELETERIOUS (MANDATORY to control used amounts) - Red

- POISONOUS (MANDATORY to control used amounts) - Green

- FLAMMABLE (MANDATORY to control used amounts) - Yellow

- OPTIONAL to control used amounts (“Used amount management: optional”) – White

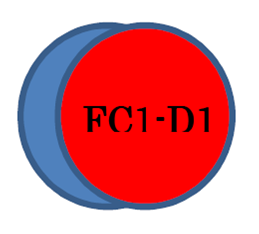
SPECIALLY CONTROLLED WASTE (Blue)– it’s not a hazardous class, but indicates that we need to separate waste, so just for you information (for halogenated solvents; benzene). Specially controlled industrial waste chemicals can be deleterious or poisonous, so put two labels and store according to hazardous class (non-hazardous, deleterious, poisonous or flammable). For example, Carbon Tetrachloride should be labeled as Deleterious, and it’s in a Specially Controlled Waste category. Store it with other Deleterious reagents and put two labels (for example, if it’s stored in Flammable Cabinet 1 tray D1, write down “FC1-D1” on the label):
Chemicals within each hazardous class should be stored with the same class of chemicals, but they should not be mixed with other classes (deleterious is stored with deleterious in a separate tray/drawer, poisonous with poisonous in a separate tray, etc, but deleterious is not stored together with poisonous or non-hazardous). Store chemicals according to our storage system and follow common chemical sense – see the list of storage locations.
Note the following when registering in CMS: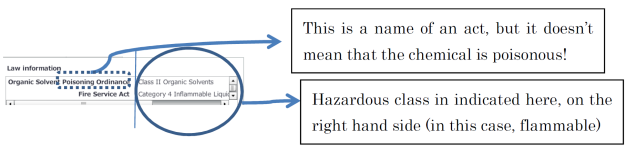
4.3 Laboratory waste
General rules for chemical waste:
- Separate waste according to OIST rules (see categories below). For organic solvents, collect waste so that water content in organic waste is less than 5%, otherwise the waste disposal procedure will become much more expensive.
- NO WASTE BOTTLE SHOULD BE LEFT OPEN! Always close the lid on waste bottles inside the hoods and in waste storage place
- Store liquid waste containers in a tray
- Waste bottle should not be completely full when submitted for disposal. Leave sufficient headspace
- To submit waste, put the corresponding sticker on a waste container and fill out a disposal form; place in a designated waste disposal location. Write full chemical names, not abbreviations or formulas (“Dichloromethane”, “Tetrahydrofuran”; “Magnesium Sulfate”, “Silicon oil” etc)
Categories of laboratory waste:
- Non-halogenated organic liquid waste
- Halogenated organic liquid waste
- Specially controlled industrial waste (see list of compounds here, including benzene)
- Heavy metal containing waste
- Waste oil
- Aqueous acidic waste (pH < 2.5) (if neutralization is difficult)
- Aqueous basic waste (pH > 12) (if neutralization is difficult)
- Solid waste (silica, filtered drying agents such as MgSO4, Na2SO4, used molecular sieves)
- Solid waste: metal (needles, foil, broken scissors)
- Solid waste: broken glass
4.4 Aqua Regia, strong acid and base waste: handling and disposal
Aqua Regia is prepared by mixing concentrated HCl and HNO3 in 3 : 1 volume ratio and is used to dissolve noble metals (Pt, Pd, Au).
There rules should be followed strictly in our lab:
- Wear PPE (labcoat, glasses, gloves).
- All operations should be performed in the fume hood. Use emergency exhaust when handle large amounts. All solutions and waste should stay in the fume hood, never outside.
- Add slowly nitric acid to HCl, not the other way around.
- Prepare only fresh solutions, only as much as you need and no more than that, and only in glass containers.
- Do not store aqua regia and dispose immediately after use. If you leave it in the hood even for a few hours, the monkey bars and stands in the hood and everything made of steel will corrode easily.
- Do not use aqua regia when you don’t need it. Read about properties of each metal before making aqua regia.
- Do not mix aqua regia with any organics. These mixtures are potentially explosive. Clean your glassware from organics and wash with water.
- Containers with aqua regia should never be tightly closed. The gases (nitric oxide etc) are constantly generated and the container will explode if stays tightly closed because of pressure building up inside.
Disposal:
- Pour aqua regia slowly into large quantity of ice-water mixture or ice (500 g of ice per 100 mL of aqua regia)
- Use only glass containers
- Neutralize with saturated NaHCO3 aqueous solution or 10% NaOH until neutral (pH ~7) reaction.
- If no heavy metals are present, you can dispose of it in the sink (but this is unlikely for aqua regia waste to not have heavy metals). If heavy metals are present (except Pt), which is most likely the case with aqua regia waste, dispose as heavy metal-containing waste separately from any other waste. If platinum is present in significant quantities, do not throw away after neutralization, as Pt waste can be collected and Pt metal is easy to recover by reduction and purification by making (NH4)2PtCl6 (turns into Pt metal sponge after baking in the oven).
- NEVER dispose of aqua regia as acidic waste without neutralization. This is dangerous for our facilities, waste storage area and workers that handle it. It also costs enormous amount of money to dispose of acidic waste. We are responsible for any waste that we generate and need to dispose of it in the most environmentally friendly and cost-efficient way.
Read more here: https://www.drs.illinois.edu/SafetyLibrary/AquaRegia
Strong acid and base waste
- Whenever you have strongly basic or strongly acidic waste, neutralize before disposing when possible and dispose in the sink if no heavy metals are present, or as heavy metal containing waste. Only if neutralization is difficult, you can dispose of it as acidic or basic waste. Disposal of such waste costs a lot of money for the institute. We are ultimately responsible for chemical waste that we generate and we need to dispose of it in the most appropriate way that’s safe for environment in Okinawa and for workers at OIST and also helps to save OIST budget. OIST drain water quality is checked regularly and we don't want to cause any harm to local environment or cause trouble to our relationships with Okinawa prefecture.
- Wear PPE and gloves that are compatible with a type of waste you are handling.
- Always store containers in a tray or other secondary container that has sufficient volume to contain all contents of the waste bottle in case of leak or if the bottle is broken.
- Use containers that are compatible and chemically resistant to a type of compounds you are handling. Check with Safety section if you have any questions.
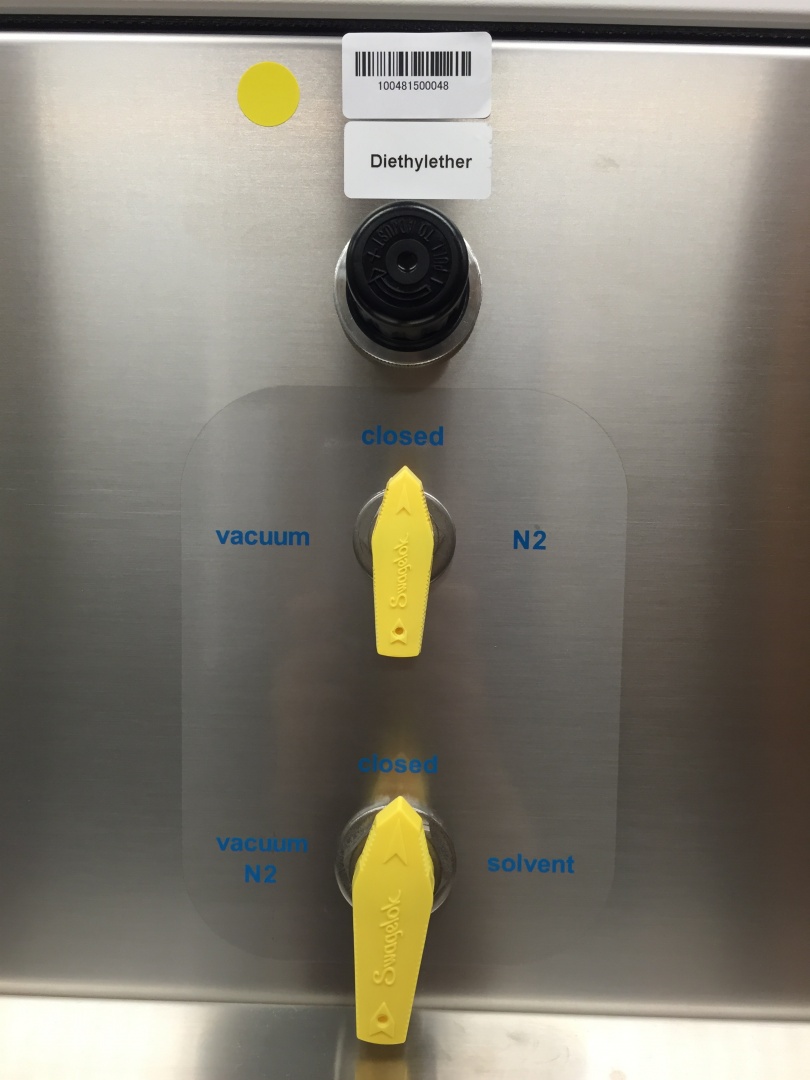
5. Solvent Purification System (SPS)
The MBRAUN instruction how to use the SPS is below (see also here and posted on the SPS).
A few general notes:
- Before using SPS, turn on the pump
- To fill out solvents outside, it’s preferable to use solvent storage Schlenk flask with 24/40 ground joint side arm and Teflon valve to provide strict protection from air/moisture.
- After finishing, don’t forget to turn off the pump
- Toluene, hexane, THF (without stabilizer), acetonitrile are provided degassed under argon in Kanto containers. Diethyl ether is the only solvent that is under nitrogen and is not degassed as well as other solvents. For sensitive reactions, after collecting ether in the storage flask, degass it on the Schlenk line by quick evacuation/refill with argon. To use diethyl ether inside the glovebox, do not collect it inside the glovebox: collect it outside to the storage flask outside, then degass, then introduce inside the box and transfer to a storage bottle, otherwise the O2 level in the box increase if you directly collect it in the box (and solvent will contain some trace air – not much, but sufficient to destroy air-sensitive compounds).
- When replacing Kanto container or doing any other operations with it, always connect grounding cable to the edge of the container.
- Solvent cabinet under the SPS should be locked with a key.
- To replace empty container, contact PI and the person currently in charge of SPS for instructions. Take full spare container from the storage in Lab 1 (only PI and person in the group in charge of CMS have key access) and order a new container in advance; record in solvent logbook to know our solvent consumption rate.
- For THF, ether and toluene, “Used amount management” is mandatory: record used amounts in CMS system (labeled on SPS with yellow and red round stickers next to solvent name).
- When replacing Kanto container, put barcode label on the wall of the SPS next to a solvent name (or attach to a magnet clip), not on the container itself. This way, if you register used amounts in CMS, you can easily scan the barcode without opening the cabinet. Example (click on image to enlarge):
Instruction from MBRAUN:
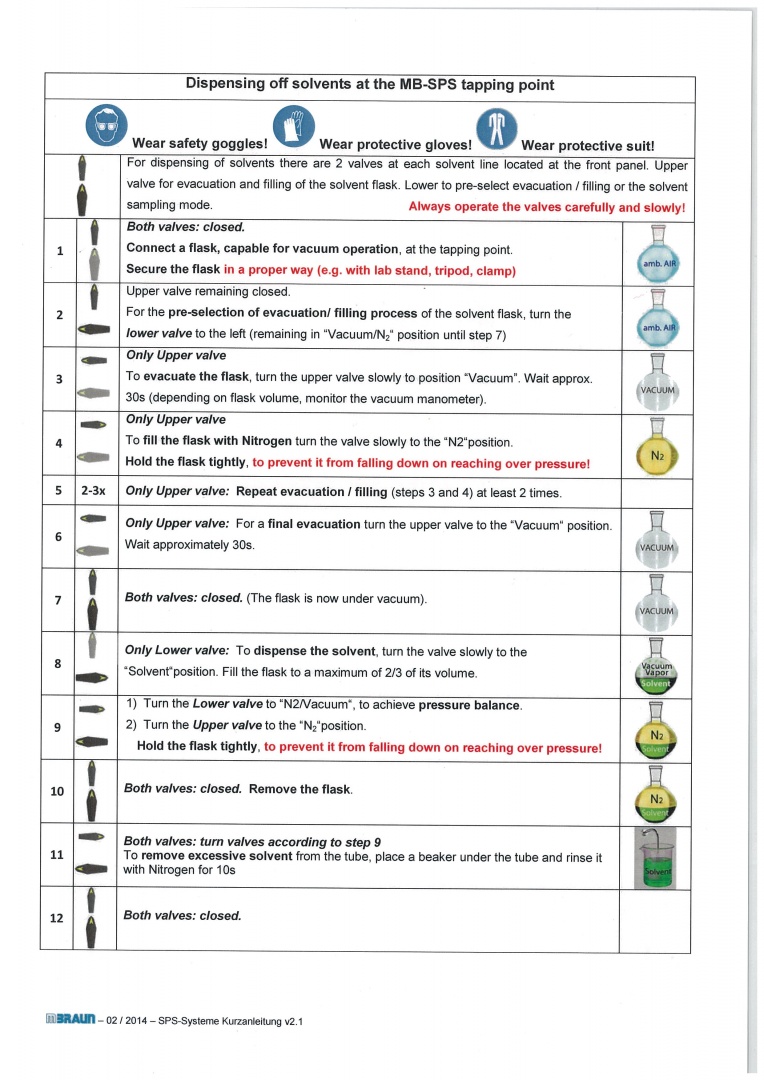
To collect solvents inside the glovebox:
- If SPS has not been used for a long time, collect first 50-100 mL of solvent inside the glovebox in a small bottle and throw it away as waste (or use for simple reactions outside). This is to ensure you remove the portion of the solvent that was sitting inside the metal pipes connecting SPS with the glovebox. Even though this solvent may be still good if there is no leak, it’s safer to remove this first small portion than contaminate the entire bottle of the solvent (thus wasting even more expensive solvent and ruining everyone’s reactions in uncontrolled manner).
- To collect solvent, put the solvent bottle on the jack (place right under the stopcock) and open the valve.
- When finished collecting, close the valve and tap the metal pipe a little bit with hand to collect remaining drops inside the pipe.
- Record in glovebox logbook that you refilled the solvent bottle. If reactions don’t work, it will be easy to check if it’s because of new solvent or for different reasons
- Even after SPS, it is better to additionally dry solvents over activated molecular sieves. You can titrate the solvent with Na/benzophenone to estimate ppm level of water (procedure posted in the lab).
- As mentioned above, diethyl ether is the only solvent that is not degassed well and is under N2, so do not collect it inside the glovebox – this will cause increase of O2 level in the atmosphere and you’ll have O2-containg solvent in the box. Collect outside, degass on the line and transfer to storage bottle in the box.
6. Handling CO gas
- Obtain safety instructions from PI before you start using CO gas for the first time. When working first time with CO in the lab, make sure you do it together with someone in our group who already did it before, or ask the PI if nobody else knows.
- We use CO gas only for reactions at atmospheric pressure or very slight overpressure (<0.2 bar overpressure). Our lab is not allowed to use CO at high pressure.
- CO gas will be handled in Room C706 only, with all operations performed inside the fume hood. The CO cylinder should be mounted inside the fume hood. Use dedicated Schlenk like in the hood connected to the vacuum pump that should also stay inside the fume hood at all times (exhaust of the pump may also contain CO). Turn on emergency exhaust when handling CO. After finishing all operations with CO, close the valve, wait for several minutes and turn off emergency exhaust.
- The room where CO is handled is equipped with: (1) wall-mounted CO detector; (2) fire extinguisher; (3) portable CO detector upon request from Facilities. In case leak is detected, alarm buzzer starts and the alarm light on the wall outside will start flashing; the central security center in Lab1 will automatically receive the signal about leak and the security and facility staffs will come to the lab. If the leak is detected either by wall-mounted or portable CO detector, stop operations with CO (close the valve), evacuate the room and close the door. Wait for security and facility staffs outside. You can mute the buzzer by pushing the button next to the warning light. When a health care is needed, call the 24-hour emergency helpline, ex.8989 or 098-966-8989.
- CO is a combustible gas. No flame or O2 gas should be used in the same lab where CO is handled (according to the rules, within 5m distance, however, considering room size it means that they simply cannot not be in the same room).
- The CO cylinder should be securely mounted to prevent from falling and damaging the valve.
- Open and close CO valve carefully and slowly. Do not apply excessive force to valve.
- Do not keep corrosive liquids in the hood and prevent corrosion to the valve from water or chemical vapors.
- CO container should be standing away from any heat sources and should be kept below 40 oC.
- To fill out Young tube or Schlenk flask with CO gas, connect to the overpressure bubbler connected to Schlenk line and CO cylinder with closed valve (!). Evacuate tubings (and if necessary, flask) and refill with N2 three times to remove air using Schlenk line. Evacuate again, then close vacuum valve on the Schlenk line, open CO valve and fill the flask with CO. Monitor carefully what is the CO pressure on a regulator when opening vacuum: make sure you don’t evacuate CO cylinder by mistake! Minimize consumption of CO.
- NEVER freeze Schlenk flasks or Young tube in liquid nitrogen when filling with CO; it will condense and blow up the tube when warmed up.
- The room where CO is stored should be locked with a key when not in use. The key will be available for the trained lab members and from the PI.
Bubbler to use with CO:
Regulations on using CO in our unit available in Japanese only - see here.