

Getting started
This site is discontinued.
Please go to SCDA-guide.oist.jp
Introduction
The Scientific Computing and Data Analysis section (SCDA) provides several HPC systems and other computing resources for you here at OIST. We provide compute clusters; high performance and secure storage; software; and various services.
Quick Start and General Information
You do not need to apply for access to storage as a remote folder.
- All members of a research unit have access to the unit storage by default.
-
You can access the storage through remote folders (Samba), or through ssh. See our page on copying data for details. For SSH access you need to apply for the cluster though this page (you don't have a home directory until you do).
-
If you are a student you may need to ask your Unit leader to add you to the unit. The unit leaders control this themselves, with no involvement from IT.
The rest of this Start Here document will be all about getting started with the computing and storage resources at OIST. Read on!
Documentation and Help
Our documentation is all on our Documentation page. This guide gives you only a brief summary, so please go to the documentation page for much more information.
We have daily Open Hours. You can ask us about anything related to the OIST clusters, to high-performance computing (HPC), or to computing and programming in general. It is in room B648, every day between 15:30 and 17:30. It is also online, using Zoom: https://oist.zoom.us/j/593265965
To contact us for help or questions you can also email us at ask-scda@oist.jp. Anything related to HPC at OIST will go directly to us, and we'll try our best to help you out.
HighSci is your personal portal page to everything related to HPC. Here you can see how busy the clusters are, what systems you have access to, how much storage you are suing and much more.
Get Access
To get access to the clusters, you need to apply. We have two kinds of computing resources: open resources that everybody at OIST can get immediate access to; and restricted resources where you need a reason for access. Most users here at OIST don't need anything beyond the open resources.
You apply for resources through this page.
Fill in this form for open resources. You will typically get access within a day, but when we are very busy it may take a little longer. In the comments, please tell us what you plan to do - this is only so we get a sense of what you're interested in.
For restricted resources you fill in this form. You need to select the specific resourse you need and tell us why you need it. We will ask you to join our Open Hours where we can talk about it with you, and tell you about any specific things to keep in mind when using the resource.
Our Resources
Background info: Clusters
Here a bit of background information on clusters and schedulers. If you are already familiar with this, feel free to skip to the next section.
-
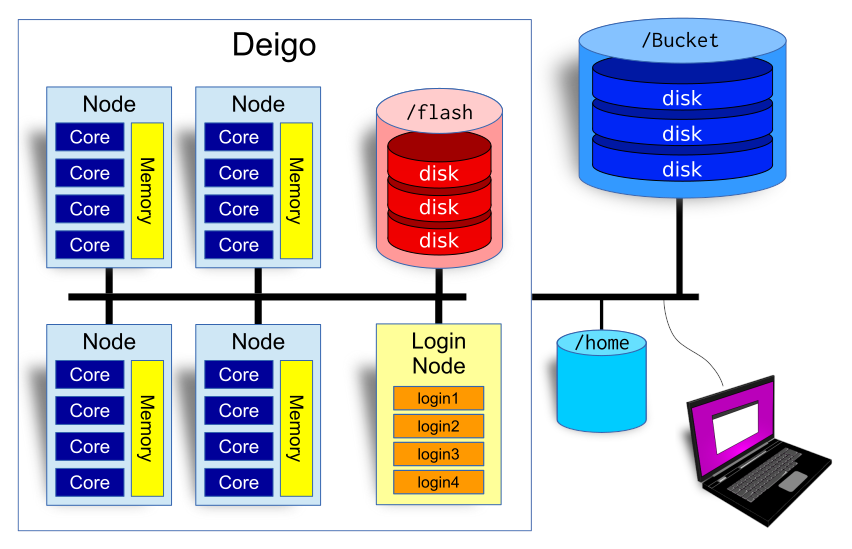
A cluster is a large, powerful computer system made up of many individual computers (called "nodes"), connected together in a high speed network.
-
Each node is a computer with it's own CPU, memory, local storage and a network interface.
-
There is also some form of fast storage systems (called "flash" and "bucket" here) connected to the network.
-
The cluster is controlled by software called a scheduler. The scheduler makes the nodes all work together. It allocates resources such as CPU cores and memory to applications (called "jobs" in HPC-speak) that users run, and it decides which job will run and when. Our scheduler software is called "Slurm".
-
In addition, there are a few machines called "login nodes" that all users log into. You use the cluster from the login nodes: this is where you run jobs, you can visualize your results, and manage your data.
You don't run programs on the cluster directly. You ask the scheduler for the resources you need — the number of CPU cores, the amount of memory and the running time — and tell it what to run. This is called running a "job". We will discuss the details further down.
This is roughly what happens when you want to run something on a cluster.
-
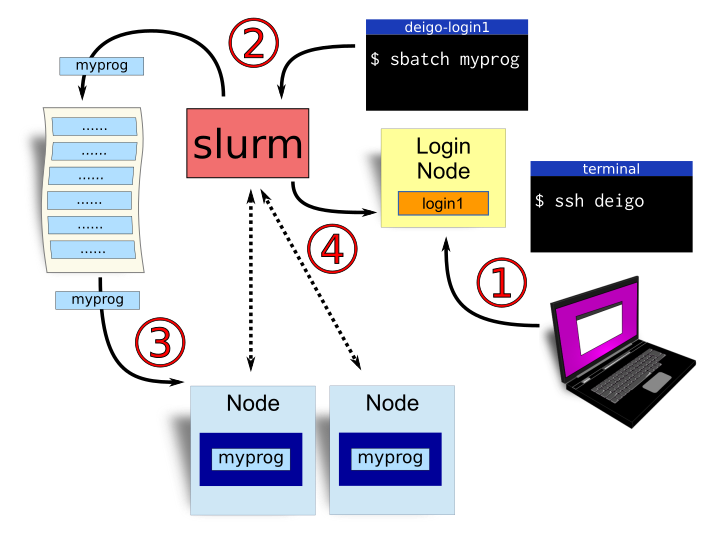
You log in to the cluster. This is usually done in a terminal, using a program called "ssh" (secure shell). Check the "log in" section below, or you can get all the details on this page.
-
You run a command to tell Slurm that you want to run a job. You tell it how many cores you want, how much memory you need and how many hours (or days) you need to finish. And you tell it how to run the program you want to use. This is a "job".
Slurm puts your job in a queue with all other jobs that users have submitted. The order is mostly decided by age, so older jobs run first, but the amount of resources you ask for and how much you've been using the cluster also matters. Check the section on "submitting jobs" or see our page on how to use Slurm and submitting jobs available here. -
When it's your turn, and resources are free for your job, Slurm will assign cores and memory to the job on one or more nodes, then start your application there. While the job is running, Slurm monitors the job to see that it's still running, makes sure it doesn't use too much memory and so on.
-
Once your application is done, Slurm will stop the job, make sure any output is saved, optionally email you, then assign the newly freed resources to another job waiting in line.
Our Clusters
We have two production clusters at OIST:
Deigo is our main system. It is used for general computing, for large-scale programs and for tasks that need a lot of memory.
Saion is a cluster with specialized nodes for things such as GPU-accelerated computing. It is often used for tasks such as deep learning and image analysis.
Storage
You have three kinds of storage available on each cluster. They are used in different ways and for different things. Our storage system overview is available on this page.
 Bucket is our main research storage. It has a large storage capacity and is backed up offsite on a weekly basis. Use this to store all your research data, your code and anything else you need to keep. Your unit has a directory on bucket where you store all unit-related data.
It is available as /bucket/YourunitU on all systems. You can read and write to it from the login nodes, from the "datacp" partition, and mounted as a remote folder on your desktop. It is read-only on the compute nodes (writing from them would slow it down too much).
 home is your personal storage space. It is small (50GB) and slow. Use this storage for personal files and documents, for source code, plots and similar. Do not use this to store any research data and do not run jobs from here - the system will slow your program down.
Your directory is in /home/X/your-username where "your-username" is your OIST user name, and "X" is the first letter. If your name is jan-moren, your directory would be at /home/j/jan-moren.
 Flash is the temporary storage system for Deigo, and work is the temporary storage for Saion. They are available as "/flash" and "/work", respectively.
They are both very fast, but have a fixed and limited space of 10TB per unit. They are available both read and write from the compute nodes. Use these as temporary storage for your applications while they are running. Be sure to clean up any data afterwards! The size is very limited and they are not backed up.
You can access the Deigo storage from Saion and vice versa: Saions Work is available as "/saion_work" on Deigo nodes; and Deigos Flash is available as "/flash" on Saion nodes.
Using the storage
-
Store all permanent data on Bucket.
-
When you run a job, read input data directly from bucket, and store any temporary data on /flash or /work.
-
At the end of your job, copy results that you need to keep back to /bucket, then clean up the data you stored on /flash or /work. If you don't, they will fill up and your unit members can't run jobs on the systems any longer.
As /bucket is not writeable directly from the compute nodes, you need to use "scp" if you want to copy results back from inside your job script:
scp /flash/MyunitU/my_results.dat deigo:/bucket/MyunitU/This will copy "my_results.dat" to bucket from flash. For more information and examples, see the Deigo page.
Using the Clusters
Log in
You log in to the login nodes from a terminal with "ssh". For Windows we recommend MobaXTerm. On Linux or Mac you only need to open a terminal. Log in to Deigo with:
$ ssh -X oist-username@deigo.oist.jpNote: "$" above signifies that this is a command you type on the command line. You don't type the "$" itself. "oist-username" is the same username you use to log in to TIDA. "-X" tells ssh to allow the use of graphical applications across the network.
This will log you in to one of the login nodes on the Deigo cluster.
For more on accessing the cluster, please see our page on connecting to the clusters.
If you have not used the Linux command line — called "bash" — before, you can take a look at our command line introduction page. If you're feeling adventurous, we also have more advanced information.
Software Modules
We have a collection of software packages installed on the clusters. They range from general languages and tools such as Python, Julia or Matlab, to scientific applications for very specific fields.
The software is installed as modules. With modules we can have multiple different versions of software and libraries installed at the same time. Our page on using modules is "use the Module system".
Deigo and Saion have different versions of the module system, but they work much the same. You have a command called "module" that lets you list, search and load software. Deigo also has a short-form command called "ml". See the page on modules above.
See the list of available ("av" is short for "available") modules:
$ module avLoad a module:
$ module load julialist all modules you have loaded:
$ module listRemove all loaded modules:
$ module purgeSee our page on using modules "use the Module system" for more information, including how to create your own modules.
Submitting Jobs
We use Slurm as our cluster scheduler. Our full documentation for using Slurm is available in Using Slurm to run your programs.
You interact with Slurm using the command line. You can run programs in two ways: interactively, or as batch jobs.
Interactive jobs
With an interactive job can use an application directly on a compute node as if you were sitting on your local computer. Langusages such as Julia, Matlab, R or Python are common as interactive jobs. But you also use interactive jobs when you want to compile and install a new application.
You start an interactive job with the "srun" command (all Slurm commands start with "s"). You tell Slurm how much time, how much memory and how many cores you like. You also must specify which partition you want to use, and what command you like to run.
Here is a complete example starting the "julia" language interpreter on a compute node. Lines with '$' are commands that you run (don't type the '$' itself). The rest is output:
$ module load julia/1.3.1
$ srun -p compute -t 2:00:00 --mem=32G -c 16 --x11 --pty julia
               _
   _       _ _(_)_     |  Documentation: https://docs.julialang.org
  (_)     | (_) (_)    |
   _ _   _| |_  __ _   |  Type "?" for help, "]?" for Pkg help.
  | | | | | | |/ _` |  |
  | | |_| | | | (_| |  |  Version 1.3.1 (2019-12-30)
 _/ |\__'_|_|_|\__'_|  |
|__/                   |

julia>
We first load julia version 1.3.1. We then ask for the "compute" partition with the "-p" option; 2 hours with "-t"; 32GB memory with "--mem"; and 16 cores with "-c".
"--pty" tells Slurm we want to see the output on screen, not saved into a file. "--x11" tells Slurm we want to allow the application to use graphical output. And "julia" itself is the name of the program we want to run.
If you want a command line on a compute node (to build an application for instance), start the "bash" application:
$ srun -p compute -t 0-4 -c 4 --mem=8G --pty bash
jan-moren@deigo011113: (15:25)
~$
"-t 0-4" is another way of specifying time; this is 0 days and 4 hours. And "bash" is the application providing a command line on Linux. Now we can use this node as our own Linux computer for the next 4 hours.
Batch Jobs
Interactive jobs are fine for short computations and interactive use. But they have a large drawback: they only run while you're actually logged in. If your network connection is broken for any reason, your job is stopped. Also, it's difficult to run more than one or perhaps two jobs at a time.
When you have jobs that take hours or days; or you want to run many jobs at once, it's better to use batch jobs.
You create a script - a text file - using an editor such as "nano" ot "gedit", that contains the Slurm parameters you need, followed by the commands you want to run. Here is an example:
#!/bin/bash
#SBATCH -p compute
#SBATCH -t 1:00:00
#SBATCH --mem=64G
#SBATCH -c 8

module load ncbi-blast
blastp -in fastafile.fasta
Save the file with a name such as "blast.slurm".
The first line tells the system that this is a bash file. Make sure that is the first line of your script.
The "#SBATCH ..." lines set the parameters for your job, in the same way as for interactive jobs. They all have to come together at the beginning, with no other commands in between.
Finally add the commands you wish to run, in the smae way you would have typed them on the command line. It's a good idea to load your modules here for instance, so you don't need to remember to do so by hand.
You submit this "blast.slurm" script as a job with the "sbatch" command:
$ sbatch blast.slurmYour job will be put in the queue, and you can log out and do something else while you wait for it to start and finish.
A batch job can't print anything to the screen when running. Instead it saves its output to a file, called "blast-00000.out", with "00000" replaced by the job ID of the job. You can list the files in your current directory with "ls" and read the output with the "less" command:
$ ls
blast.slurm     blast_1243876.out
$ less blast_1243876.out
Use arrow keys to navigate back and forth in the file, "/" to search, and "q" to quit.
Manage your jobs
There are a few useful commands to examine and manage your submitted jobs.
"squeue" will show the state of your jobs:
$ squeue
             JOBID PARTITION     NAME     USER ST       TIME  NODES NODELIST(REASON)
               166   compute    sleep jan-more  R       0:16      1 deigo010923
It will list the job ID, the partition, the name of the job (the name of the application you run by default), your user name and the state. The meaning of "TIME" and "NODELIST" depends on the state.
The state is usually either "PD" ("Pending") which means it's waiting for its turn; or "R" ("Running") which means your code is running. Sometimes you can see "CG" which means it's finished, and Slurm is cleaning up.
When it's in state "PD" the "TIME" field will show the estimated starting time, or nothing at all if there is no estimate. The "NODELIST (REASON)" field will tell you why it's not yet running.
In State "R", "TIME" shows you how long it's been running, and "NODELIST" gives you the list of nodes your job is using.
scancel will stop your jobs:
$ scancel 166This will cancel the job with job ID 166. You can also, for instance, cancel all your jobs with "-u
Optionally you can ask Slurm to email you when it's done - see the Slurm documentation for more.