

The Command Line - an Introduction to Bash
This site is discontinued.
Please go to SCDA-guide.oist.jp
Most of your interaction with our HPC resources is through the terminal command line, or shell. You're likely used to applications with nice graphical user interfaces. Why do we mostly use the old-fashioned command line when using the clusters?
Let's cover a bit of terminology first:
- A "command line" is a way to interact with a computer. You type in a line of commands (hence "command line"), and see the output, usually (but not always) as text.
- The command line is often provided by a "shell", a specialized program that takes your input, acts on it, and gives you the output back. Sometimes, complex software can provide their own command line — Python, R, Matlab and Julia are languages that all have a command line for you to interact with them for instance.
- The "terminal" is an application (it used to be actual hardware) on your local machine that acts as the screen for a shell and other command line applications.
So, why do we use this? Command line interfaces are widely used because of some important benefits:
The command line interface is powerful and composable. You can do some very complicated things by combining just a few commands, and do it faster and with fewer mistakes than with a graphical interface. Simple things are easier with a graphical UI; complicated things are easier on a command line.
The shell is scriptable. You can create scripts — small programs — that automate repetitive tasks and let you redo them without having to remember exactly how to do it. This reduces the number of errors, and the script becomes your record of how you did something. A lot of work on the cluster involves doing the same tasks over and over again, with minor variations. Making those tasks a script saves you an enormous amount of effort.
Finally, the command line interface is low bandwidth. A terminal connection will work fine almost no matter how slow or stuttery your connection is. You're just transmitting small bits of text across the network. You can log in and get work done from a bad connection right across the world.
Are there no drawbacks? Yes, there are: command lines are usually not very discoverable. That is, when you have a command line open, you get little or no idea what you can do with it, or how you do it. A graphical UI on the other hand is great for that: you can look through the menus, buttons and other controls and get a pretty good idea of what you can do. Command lines are powerful but not obvious; GUIs are obvious but not powerful.
We’re going to describe the “bash” shell. This is the most common shell on Linux systems, and the default shell on our clusters. There are a lot of resources out there about using Bash. We can only give you a quick introduction here. We have a second part to this guide on advanced Bash usage; feel free to look there for more information.
- Introduction to Bash
- Shell Variables
- The .bashrc settings file
- Access Permissions
- Editors
- Summary
- More commands and patterns
About the file system
The clusters are Linux machines, and use the Linux way of organizing the file system. If you haven’t used Linux before, this can be a little confusing at first.
If you come from Windows or OSX
Unlike Windows, there are no different drive letters. All file systems sit in the same single directory tree, as subdirectories (or “folders”) under a single top-level directory. We separate directories with ‘/’. Just / by itself is the top level directory, /tmp is the directory “tmp” under the top directory, and /usr/bin is the “bin” directory, under the “usr” directory under the top.
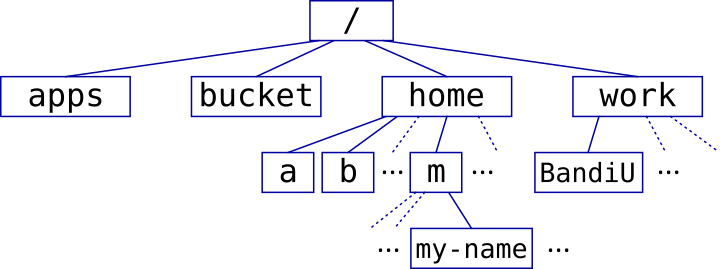
You have a home directory, where you keep your own files. On our clusters the home directories are organized under /home, with users further subdivided by the first letter of their user ID. User “my-name” has their home directory in /home/m/my-name for instance.
File extensions are not necessary and their meaning is not enforced. Text files do not need to have an ending .txt, and files ending with .txt do not need to be text files. With that said, it’s a good idea to follow common conventions and give your files names that make sense.
Introduction to Bash
Let us take a first look at the Bash shell. You may already have noticed that the shell uses $ as a command prompt. In our documentation we add a $ in front of shell commands to make it clear that it’s something you type. We also use “#” as a comment marker.
We need some example files and data. Let’s copy that data to our home directory. Log in to Deigo, then run this command (don't type in the comments or the initial "$"):
# copy the "Intro" folder to your home
$ cp -r /apps/share/training/Intro .      # the format is cp [option] <from> <to>
Here “cp” is a command, short for “copy”. “-r” is an option that changes how the command works in some way. The “-r” option makes cp copy an entire directory, not just a single file. “/apps/share/training/Intro” is the source of the copy command, and “.” is the destination (the current directory).
A Handy tip: You can use the TAB key to “fill in” directory and file names. You can start to type the command above: cp -r /a then press the TAB key. If there’s only one thing beginning with “a”, the shell will fill in the rest of the directory name: cp -r /apps/. If there’s more than one possible name, you can press TAB twice to see the possible alternatives. This is very useful, and makes the command line much faster to use.
The ls command lets you see what’s in your current directory. Let’s see what you have in your home:
$ ls
Intro/
If you are a new user, you probably only have the Intro/ directory that we just copied above. The -a option to ls will show you all files:
$ ls -a
.   .bash_history  .bash_profile  Intro      .ssh
..  .bash_logout   .bashrc
The files starting with a dot or full stop are normally hidden, but the -a option shows them. Note also how the shell shows you directories in blue, and regular files in black. Executable files — programs — are green.

The format of a command line. $ is a prompt, telling you you can type something. Other programs with command line interfaces such as Python, Matlab or R may use other prompts such as >, >> or :.
Most commands you enter in a shell are actually full programs. ssh is one example. Many commands take parameters, often filenames, but they could be anything.ssh took our username and machine address (<my-name>@deigo.oist.jp) as a parameter for example.
Most commands take options that alter how they work. Short options use one hyphen and a single letter (such as -a for ls or -X with ssh), and long options use two hyphens and a whole word (--all). Short options can be combined together, so -n and -r can be -nr. Short options reduce the amount of typing, while long options are more readable in scripts.
You can always get your current working directory with pwd:
$ pwd
/home/m/my-name
Our home directories are all under /home. Your home directory has the same name as your user name. Since there’s quite a lot of users, we sort them into subdirectories by first letter.
Use the tree command to see the layout of directories and files:
$ tree
!-- Intro
    !-- code
        !-- array_example.slurm
        !-- array_patterns.slurm
    ...
In practice tree is mostly useful when you start learning the shell. The output becomes too big and unwieldy once the number of files increase.
A handy tip: If you press the up arrow key on your keyboard you can go back to previous commands you entered. You can then edit that command line instead of typing in everything from the beginning. This is very useful when you want to do something repeatedly.
Getting help
The command line is powerful, but it can be difficult to find out how to actually do things. Here are a few ways to find more information.
Most commands accept the -h or --help option. You get a short description of the program and its options. This is perfect when you have forgotten some detail about a command. Example:
$ ls --help
Usage: ls [OPTION]... [FILE]...
List information about the FILEs (the current directory by default).
Sort entries alphabetically if none of -cftuvSUX nor --sort is specified.

Mandatory arguments to long options are mandatory for short options too.
  -a, --all                  do not ignore entries starting with .
  -A, --almost-all           do not list implied . and ..
      --author               with -l, print the author of each file
  -b, --escape               print C-style escapes for nongraphic characters
...
Help texts typically look like this, with a usage pattern (“ls [OPTION]... [FILE]...”), a quick description, then a list of all options. Some commands have only a short one- or two-line help text, while others can have a long, complete description.
Many programs also have manual pages that you can access with the man command:
$ man mkdir
MKDIR(1)                     User Commands                        MKDIR(1)

NAME
   mkdir - make directories

SYNOPSIS
   mkdir [OPTION]... DIRECTORY...

DESCRIPTION
   Create the DIRECTORY(ies), if they do not already exist.

   Mandatory arguments to long options are mandatory for short options too.

   -m, --mode=MODE
          set file mode (as in chmod), not a=rwx - umask
[...]
AUTHOR
[...]
REPORTING BUGS
[...]
COPYRIGHT
[...]
SEE ALSO
   mkdir(2)
[...]
When viewing the manual page, you can move up or down with the arrow keys or <PgUp> and <PgDn>, you can search the page for something with “/something”, and you quit with “q” (the man command uses the less command to show its output).
Man pages have a fixed structure with a number of sections. First comes the name of the command and a one-line summary, followed by synopsis lines that show you how to run the command. Generally, things inside square brackets, such as [OPTION], are optional, while parts without brackets (“DIRECTORY”) are mandatory. Ellipsis (“…”) means you can have multiple instances.
mkdir [OPTION]... DIRECTORY... means that you need at least one, and possily more, directory names to create. And you can add multiple options to the command.
The “DESCRIPTION” section gives you a full description of the command and of all its options. This is where you find out what options are available and what they do. The author, bug reporting and copyright sections are usually not very interesting. The last section “SEE ALSO” lists other commands or topics that could be related.
Man pages belong to one of several sections, with section 1 user commands, 2 and 3 are system calls and library functions for programmers, 5 is file formats and so on. You search a particular section with man <nr> something or all sections with man -a something.
If you don’t know the command name, try searching with “apropos”. It will search man pages for any description that matches the string you give it:
$ apropos sort
alphasort (3)        - scan a directory for matching entries
apt-sortpkgs (1)     - Utility to sort package index files
bsearch (3)          - binary search of a sorted array
bunzip2 (1)          - a block-sorting file compressor, v1.0.6
bzip2 (1)            - a block-sorting file compressor, v1.0.6
comm (1)             - compare two sorted files line by line
qsort (3)            - sort an array
qsort_r (3)          - sort an array
sort (1)             - sort lines of text files
texindex (1)         - sort Texinfo index files
tsort (1)            - perform topological sort
versionsort (3)      - scan a directory for matching entries
XConsortium (7)      - X Consortium information
As you can see, it gives you any man page description with the string sort in it, such as the last line with “consortium”. If you just want hits that match your search exactly, add ‘^’ to the front of the word:
$ apropos ^sort
qsort (3)            - sort an array
qsort_r (3)          - sort an array
sort (1)             - sort lines of text files
texindex (1)         - sort Texinfo index files
Also remember that there is a lot of material about using the command line on the net. If you’re looking for a way to do something, or if you get an error you don’t understand, then search for it on the web. You’re very likely to find a solution to your problem.
Files and Directories
Take a look at our home directory with ls -a again:
$ ls -a
.   .bash_history  .bash_profile  Intro      .ssh
..  .bash_logout   .bashrc
There are two special directories with very special names: “.” (one full stop) and “..” (two full stops). They are present in every directory. “.” means here, or the current directory. When we copied the training data to our home directory with cp earlier, the destination was “.”. You use “.” when you want to do something to the current directory without having to type out the path.
The “..” directory is the parent directory. You can use this to get to the directory one step up from wherever you are. Let’s see what the directory one step above our home looks like:
# Where are we now?
$ pwd
/home/m/my-name

# list the files and directories in our home
$ ls
Intro

# list files and directories one step up
$ ls ..
mrs-norris  my-name  myrtle-w  ...
You can of course use “..” as part of a longer pathname. These all refer to the same directory:
$ pwd
/home/m/my-name

# list one step up
$ ls ..
mrs-norris  my-name  myrtle-w  ...

# Two steps up, one step down
$ ls ../../j
mrs-norris  my-name  myrtle-w  ...

# One down, two up
$ ls Intro/../..
mrs-norris  my-name  myrtle-w  ...
Your Home
As we said above, all users have their own home directory. What if you want to refer to your home in a command line? Writing out the entire /home/m/my-name every time would be long-winded.
The “~” (tilde) character by itself is shorthand for your home directory. So these are the same thing:
$ ls /home/m/my-name                    # List the contents of home
$ ls ~                                  # same thing
There is another way to refer to your home: the shell variable “HOME” always contains your home path. You get the value of shell variables with “$” (dollar sign). So you could also write:
$ ls $HOMEWe cover shell variables in more detail later. Which one should you use? “~” is faster to type. “$HOME” is clearer when you are writing a script. Ultimately it’s just personal preference.
Basic Commands
Here are a few commands that are very useful when working with the cluster.
The “cd” command is short for “Change Directory”. This is how you move around:
$ pwd
/home/m/my-name

$ ls
Intro

$ cd Intro
$ pwd
/home/m/my-name/Intro
Just cd all by itself will always take you back to your home directory:
$ cd
$ pwd
/home/m/my-name“cp” is short for “copy” and copies files. We already used it when we copied the example data to our home. The pattern is cp <from>... <to>. If <from> is a single file, then <to> can be another filename. Otherwise <to> has to be some directory where all the files get copied to.
Let’s copy the file “Intro/text/animals.txt” to our home:
$ cp Intro/text/animals.txt ~
$ ls
animals.txt  Intro
As we saw early on, cp has the “-r”, or recursive option. With it we can copy entire directories and all their contents. Let’s copy the entire text directory to our home directory. We can also give our copy a new name at the same time:
$ cp -r Intro/text ~/my_text_copy“mkdir <directory name>” creates a new directory:
$ mkdir Animals
$ ls
Animals   animals.txt my_text_copy Intro
We can read the contents of files with the “less” command:
$ less animals.txtYou can move around in the file with the arrow keys or <PgUp> and <PgDn>, search the page for something with “/something”, and you quit with “q”. The man command we saw earlier uses less to show the manual page.
“mv <from> <to>” moves a file or directory. You also use it to rename things by moving them to a new name. Let’s move animals.txt into our new directory Animals:
$ mv animals.txt Animals
$ ls Animals
animals.txt“rm <something>” stands for “remove” and deletes files and directories. Like “cp” you need to use the -r option to delete directories and their contents:
$ rm Animals
rm: cannot remove 'Animals': Is a directory
$ rm -r Animals
$ ls
Intro my_text_copy
Wildcards
It’s all well and good to work with single files. But often you want to, say, move all files in a directory somewhere else, or delete all files of a certain type. Wildcards let you match multiple files with a single pattern.
You can match file and directory names with *, ?, [] and {,}. “*” means “any sequence of characters”, “?” means “any single character”, “[character list]” matches any character listed inside the [] brackets, and “{string,string[,string ...]}” matches any of the strings listed in commas inside {} brackets. You use * very often; the others much less.
As an aside, there's another, confusingly similar way to match patterns called "regular expressions". It's the same idea but much more powerful. We bring them up when describing the grep command below and in the advanced guide here.
Let’s go to the code subdirectory:
$ cd ~/Intro/code
$ pwd
/home/m/my-name/intro/code
$ ls
...
Now, let’s list just a subset of files, to test these wildcards:
$ ls *c                        # files ending with 'c'

$ ls pi*                       # files beginning with 'pi'

$ ls [a-i]*.slurm              # files beginning with letters 'a' to 'i',
                               # and ending with '.slurm'

$ ls *.{mpi,omp,bipp}.slurm    # files containing 'mpi', 'omp' or 'bipp'
                               # followed by '.slurm'
Note that with {} there has to be at least two alternatives with a comma in between.
Wildcards are a feature of the shell, not the command. Let’s look at the first command again:
$ ls *c
pi_mpi.c  pi_omp.c  pi_serial.c
First the shell sees the “*c” wildcard. It finds out what files match, and expands the wldcard into the list “pi_mpi.c pi_omp.c pi_serial.c” on the command line. Only then does it actually run the command, which now looks like:
$ ls pi_mpi.c pi_omp.c pi_serial.cThe ls command never sees “*c” at all, only the expanded list of files. We’ll see further below that shell variables work the same way.
Redirection
Many shell commands simply print the results on to the screen. And many take input from the terminal as well. However, we can redirect the output of a command into a file, and redirect a file into the input of a command.
First, let’s go to the “text” directory:
$ cd ~/Intro/textThere is a utility called “sort” that sorts the lines of its input. Let’s try it out:
# start "sort" without options and it waits for us to enter input
# Let's enter some words
$ sort
dalek
ball
ant
clock
[ctrl-d]        # Press ctrl and d to stop the input
ant
ball
clock
dalek
It waited for us to type a list of lines, then sorted them for us. Neat, but perhaps not terribly useful. sort can also take a file name as argument, and it will sort the contents of the file:
$ sort animals.txt
Fly         insect      100
Habu        reptile     1
Platypus    weird       5
Pterodactyl extinct     0
Rabbit      mammal      15
sort outputs the sorted results onto the screen. But what if we want to save the output into a file? We can use the ‘>’ operator:
$ sort animals.txt >sorted.txt
$ less sorted.txt“>filename” saves the output into filename, and replaces whatever was in the file with the output. Think of > as an arrow pointing where the data will go. If you don’t want to lose what’s already in the file, you can append the output to the end of the file with “>>filename”.
Normally, only the regular output goes into the file, while errors and other messages still go out onto the screen. This is often what you want. But sometimes you want everything to go into the file. You might start a long-running analysis or simulation, or build an application, and you want to save all the output into a log file. Use the ‘&>’ variant:
$ make &>make.logThis would build some program and save all output, all messages and all errors into the file make.log. (make is a utility for building applications).
In the same way that > redirects the output from the screen into a file, < can redirect the input to a command from the keyboard to a file. As we saw, the sort command can take input from the keyboard as well as a file name, so we could have run it as:
$ sort <animals.txt >sorted.txtsort now acts as a filter, taking an input stream from one source, sorting it, then outputting it to another.
How does this work? All programs have three special “files” open by default. One, “stdin”, is an input and normally connected to your keyboard when you run interactively. That’s what we used when we entered words directly into sort above.
One is called “stdout” and is an output connected to your terminal screen. Anything the program prints goes through this outpit. The third, “stderr” is for error and diagnostic messages, and is also connected to the screen.
The ‘>’ operator redirects stdout from the terminal to whatever file you give it. In the same way, ‘<’ redirects data from a file to the standard input of an application. And &> redirects output from both stdout and stderr to the same file.
Pipes
Let’s create a second list of animals. Use the nano editor to create a new file my_animals.txt:
$ nano my_animals.txtFill in the following animals (nano is exceedingly simple; you can’t even use the mouse):
Octopus         tasty       2
Bacteria        small       1000000
Giraffe         tall        1
Save this and exit by pressing the “ctrl” key and “x”, then confirm that you want to save.
If we want to sort both animals.txt and my_animals.txt into a single file, we need to concatenate the files. The versatile “cat” (for “conCATenate”) command takes a list of files and outputs them in order to the output:
$ cat animals.txt my_animals.txt
Fly         insect      100
Habu        reptile     1
...
We can use cat to concatenate the files into a single file, then sort to sort it:
$ cat animals.txt my_animals.txt >all.txt
$ sort <all.txt >sorted.txt
cat concatenates the two files into “all.txt”. Then sort reads “all.txt”, sorts it and outputs it into “sorted.txt”.
But we don’t really need that intermediate all.txt file. It’s only a temporary file to hold the combined list. We have to remember to remove it when we’re done, and if the input files are big — say, several million lines — it can take time to create and waste a lot of space.
Instead, we can connect the output of a command directly into the input of another, like this:

We use the “|” operator, called pipe, (think of it as a water pipe connecting the output of the first command to the input of the second) to do this:
$ cat animals.txt my_animals.txt | sort >sorted.txt This is faster since it never stores data on disk. It also takes less memory, and you don’t get any temporary files to clean up afterwards.
Here are a few common ways to use pipes. The “wc” command stands for “Word Count”, and with the -l option you get the number of lines in the input. Use it to, for instance, count the number of files in a directory:
$ ls ~/Intro/code| wc -l
17
Another, very common way to use pipes is when you use a command that prints a lot of data on screen so it’s too long to read. You pipe the data to the ‘less’ command we’ve already used:
$ ls --help|less
sage: ls [OPTION]... [FILE]...
List information about the FILEs (the current directory by default).
Sort entries alphabetically if none of -cftuvSUX nor --sort.

Mandatory arguments to long options are mandatory for short options too.
  -a, --all                  do not ignore entries starting with .
  -A, --almost-all           do not list implied . and ..
      --author               with -l, print the author of each file
...
It’s often very useful to see what files and directories take up the most space. “du” shows the “Disk Usage” of files, with “-a” for “all files and directories” and “-h” to print sizes in human-readable form (using “K”, “M” and so on for sizes):
$ du -ah ~/Intro | sort -hr | head -n 10This finds the total size of all files and directories under Intro; sorts the human-readable values (“-h”) with the largest at the top (“-r” for “reverse order”); and shows us just the top 10 files and directories using the “head” command.
The “grep” command searches its input for patterns. It uses regular expressions which are like the wildcards we saw above, but more powerful. Below is a quick example on how to use it with the “history” command.
“history” lists all commands you have run on the command line. So if you want to see all commands you’ve run that contain the string “ cd ”, you could do:
$ history | grep " cd "The details of grep and regular expressions is outside the scope of this tutorial. We have more information in our advanced guide. You can also find a lot of information online; search for “grep tutorial” to find out more. It’s a powerful command.
Shell Variables
We have seen a variable already, our HOME, and we will encounter more of them later on when we discuss how to run jobs on the clusters.
The HOME variable contains the path to our home directory. We get the value of a variable with $VARIABLE or, better, ${VARIABLE} which substitutes or replaces the variable name with its contents:
# Prints the contents of "HOME"
$ echo $HOME
/home/m/my-name

# Same thing, less ambiguously
$ echo ${HOME}
/home/m/my-name“echo” prints its input onto the screen. Just like we saw with wildcards earlier, the shell first sees the variable expansion ${something} and susbtitutes that with the value of the variable. Only then does it run the resulting command line.
So the echo command never sees “$HOME”. The Bash shell has already replaced it with the value, so when echo runs it’s actually running:
$ echo /home/m/my-name
/home/m/my-name
You set the value of variables with “NAME=value”. Note that you can’t have spaces around the “=” (if you do, bash will think “NAME” or “value” are commands to run):
$ v="my variable"
$ echo $v
my variable
What’s the difference between writing “$variable” and writing “${variable}”? “${variable}” is the fully correct way to expand the variable, but “$variable” is quicker to type, and it also perhaps looks nicer. The main practical difference is that “${variable}” is never ambiguous. For example, if you want to create a filename by substituting a variable into the file name, then $variable might become ambiguous:
$ v=05
$ echo $v
$ echo file_$v_something.txt
You meant “file_${v}_something.txt”, but “_” is allowed in variable names, so the shell thinks you mean a variable called “v_something”: “file_${v_something}.txt”. You wanted “file_05_something.txt” but got “file_05.txt” instead. If you use “${...}” then it’s always clear what you mean.
You can find out more about shell variables and what you can do with them in our advanced guide.
The Environment
Shell variables are local to the script or command line instance that you are in. If you set a variable, then start a new shell, or a script, or a program, they will not see the variable and the value that you set. For example:
# set a variable, then echo its value
$ a="eye of newt"
$ echo $a
eye of newt

# start a new shell (a "subshell"), then echo the value of a
$ bash
$ echo $a

# exit the new shell, so we're back in the first one, then echo again
$ exit
exit
$ echo $a
eye of newt
The environment is a collection of shell variables that are visible to all new shells, scripts or commands. You can set an environment variable with the “export” command:
# set a variable, export it, then echo its value
$ a="eye of newt"
$ export a
$ echo $a
eye of newt

# start a new shell, then echo the value of a
$ bash
$ echo $a
eye of newt
You can combine setting a variable and exporting it, and you can see all the environment variables with the “env” command:
$ export a="eye of newt"
$ env | less
...
HOME=/home/m/my_name
USER=my_name
a=eye of newt
IM_CONFIG_PHASE=1
...
Environment Variables
The shell defines a number of useful environment variables when you log in. Some are meant for reading only, some you can change as needed. Let’s take a look at a few of them.
“HOME” is your home directory. Whenever you want to refer to your home in a script (perhaps you need a path that starts in your home) you can use $HOME to refer to it.
Why not just use your actual home path directly? You might want to use this script on a different system, or give it to a colleague for them to use, or our system for organising home directories might change in the future. When you use $HOME you’re sure to always have the right path to home.
“USER” is your user name. As with HOME, using $USER makes your scripts general and useful for any user, not just yourself.
“PATH” is a list of directories where the shell looks for programs to run. When you do “$ someprogram”, bash will search all directories in PATH, in order, to find an executable program with that name. Let’s take a look at what it might look like:
$ echo $PATH
/home/m/my_name/perl5/bin:/usr/share/Modules/bin:/usr/local/bin:/usr/bin:
/usr/local/sbin:/usr/sbin:/opt/shared/local/bin:/opt/dell/srvadmin/bin:
/opt/shared/deigo/slurm/bin:/home/m/my_name/bin
That’s a handful. It’s a list of directories, separated by colon ‘:’ characters. Each directory is a place bash will look for a program to run when you type something on the command line.
If you want to run a program that’s not in one of the pre-defined directories, you need to explicitly give the path to it:
# run 'myprog' in the current ('.') directory
$ ./myprog

# run 'lammps' in /apps/unit/Myunit/Lammps/bin
$ /apps/unit/Myunit/Lammps/bin/lammps
Typing the whole path every time gets very tiring after a while. You can add directories to the list, and once you’ve added it you no longer need to type the whole path. Here is how you do it:
# We add our new path "/apps/unit/Myunit/Lammps/bin" to PATH
$ PATH="/apps/unit/Myunit/Lammps/bin:$PATH"

# We export PATH so its new value is visible everywhere
$ export PATH

# print out the new value
$ echo $PATH
"/apps/unit/Myunit/Lammps/bin:/home/m/my_name/perl5/bin:/usr/share/Modules/bin:
/usr/local/bin:/usr/bin:/usr/local/sbin:/usr/sbin:/opt/shared/local/bin:
/opt/dell/srvadmin/bin:/opt/shared/deigo/slurm/bin:/home/m/my_name/bin

# Now we can run 'lammps' directly, without giving the path to it
$ lammps
What happened above? We are setting PATH to our new directory “/apps/unit/Myunit/Lammps/bin/”, followed by a colon “:”, followed by “$PATH” - that is, what PATH is already set to. The effect is that we added our new path to the beginning of the list.
One problem: our new setting only applies as long as we stay logged in. Once we log out our new addition to PATH will disappear. We need some way to make this kind of settings happen automatically. How? Continue to the next section to find out!
The .bashrc settings file
In every home directory there is a file called “.bashrc”. The leading dot means it’s not visible by default. If you want to see hidden files (also called “dot files”), use the “-a” option (for "all") to ls:
$ ls -a
...
.bashrc
.ssh
The .bashrc file is a script, and it's run by Bash every time you log in. Here you can add any commands that you would like to run and any settings you'd like to set. A great example is adding a path to the PATH environment variable we saw in the last section. You can edit the file (see the section on editors if you like) and add the PATH setting lines there.
The .bashrc file is also where you can set all kinds of other things. You can change your command line prompt, add your units module area so you can use unit modules directly, define aliases for common commands and much more. Here’s an example of a few things you could set:
# part of a typical .bashrc file

# easily run python programs installed locally
PATH="$HOME/.local/bin:$PATH"
export PATH

# define an alias to list files in long format, newest files at the bottom
alias ll='ls -trl'
There’s a lot more things you can set in this file. For more ideas, seach for “bashrc” on the net.
More about Files: Users, Groups and File permissions
ls can give us a lot of information about our files and directories. A very useful option for ls is -l for “long format” which gives us a lot of information about our files:
$ cd ~/Intro/code
$ ls -l
totalt 429
-rw-r--r-- 1 my-name someuni   210  1 maj 11.57 array_example.slurm
-rw-r--r-- 1 my-name someuni  1036  1 maj 11.56 array_patterns.slurm
-rw-r--r-- 1 my-name someuni   309 26 apr 14.32 array_threes.slurm
-rw-r--r-- 1 my-name someuni    88  1 maj 11.15 batch_example.slurm
-rwxr-xr-x 1 my-name someuni 13093 25 apr 13.16 pi_mpi
...
That’s a lot of information. The first line tells you how much is stored in total, in Kb. Then comes a list of files, one per line, with information about each one.
Look at the second line near the top. From right to left, we see the file name — “array_example.slurm” — then that it was last modified on may 1st at 11:57; that it is 210 bytes long; that it belongs to user “my-name” and group “someuni”; the number of links to it (don’t worry about that one) is 1; and the file permissions.
Users and Groups
Every file and directory has an owner and a group. Every user belongs to at least one group, their primary group. At OIST, researchers all belong to the group for their unit. Students belong to “allstudents”. Users can also belong to any number of secondary groups. So students, for instance, will also belong to their current unit as well as “allstudents”.
You can see what groups you belong to with the “groups” command:
$ groups my-name
my-name : allstudents domain users student someuni
File permissions
Take a look at the file permissions above for two of the files:
-rw-r--r-- 1 my-name someuni   210  1 maj 11.57 array_example.slurm
-rwxr-xr-x 1 my-name someuni 13093 25 apr 13.16 pi_mpi
File permissions decide who can do what to a file. Files have a user that owns the file, and a group. Unlike your group settings, a file can only have a single group. The permissions say what the user can do, what other users in the same group can do, and what everyone else can do.
The permisisons are displayed as a string of characters at the far left. The first character is “-” for a normal file, and “d” for a directory. Above, the “array_example.slurm” and “pi_mpi” are both regular files, so the first character is a “-”.
The rest are three pairs of three characters each. They tell you if you can read the file (“r”), write to it (“w”) and if you can execute it as a program (“x”).
The leftmost group of three is the users (owners) permissions; then the group permissions; and last the permissions for anybody else. So with the array_example.slurm file, user “my-name” can read and write it (“rw-”), while other members in the “someuni” group can only read it (“r--”) and others on the system can only read it (“r--”).
The second file, “pi_mpi”, is an executable program. It has the same permissions except that the owner, the group and anybody else can all also execute it (“x”).
Does that mean that anybody on the system can read and execute these files? No, it does not. This is where directory permissions come in.
For directories the permissions have a slightly different meaning. “r” and “w” means permission to read and write files inside the directory, while “x” means permission to see the content — the files and subdirectories — inside.
These permissions propagate downwards. If a directory does not give permission to, say, read files for other people, then nobody can read the files inside even if those files have set “r” for everybody.
Let’s go up to our home and see what permissions our home directories have:
$ cd
~$ ls. -ld /home/m/my-name
totalt 306
drwxr-xr-x 52 my-name      someuni       3142 1 may 16.22 my-name
Our home has a “d” in the first character, as it is a directory.
As you can see our top home directory gives ourselves full access with “rwx”. Other people can (“r”) read data in your home and (“x”) list the contents of your top directory. But only you can actually change anything in there. And these restrictions propagate downwards, so the files and directories you create inside can never be changed by somebody else no matter what permissions we set for them.
If you don’t want anybody else to see anything in your home, you can change the permissions. The command for that is “chmod”. Here is how to remove the “r” and “x” flags for group members and for others:
$ chmod go-rx /home/m/my-namechmod has an unusual option format. You first list who the change applies to: “u” for the user, “g” for the group, and “o” for others, or everybody else. You can also use “a” for everybody (“all”). Then a minus sign “-” to remove permissions, a plus sign “+” to add permissions, or an equals sign “=” to set them exactly. Then a list of the permissions you wish to set or change: “r” for read, “w” for write, “x” for execute (or list, for directories) and so on.
Finally you give it the target to change. If you want to make a change to all files inside a directory, “-R” (for “recursive”) will do that.
If you change the permissions on your home, be aware that there are programs that might not always work properly if you remove the ability for the group to read your home. If you ever run into that problem it is of course easy to change the permissions back again.
As we saw above, if you belong to a unit, you belong to that units’ group as well. Your unit has a directory in /bucket on Deigo, where you store your data, and in /flash where you run your jobs:
$ ls -l /flash
[...]
drwxrws---  2 root sugawarauni            4096 19 jun  2020 SugawaraU
drwxrws---  2 root takahashiuni           4096 19 jun  2020 TakahashiU
drwxrws---  4 root tanuni                 4096 16 mar  2021 TanakaU
[...]
As you can see, here the directories all grant full access to unit group members and to the privileged “root” account (who is the owner) but to nobody else. So each unit can use this directory as their own private storage and manage it as they wish.
The “s” permission instead of “x” is a little bit special. When it’s set, any file created inside will get the group of this directory. If we didn’t have it, a file created by a user would get that users primary group, which is not what we want (remember that students have an “allstudents” primary group, not the unit group).
Text Editors
You need a text editor of some kind to do many things. There are several to choose from, but in this tutorial we’ll just quickly present a couple of common alternatives.
nano
The easiest editor to use is ‘nano’, and it’s the one we assume that you’re using. It’s very small and simple. You can write and delete text, copy and paste, search and replace; and that’s it. You start it simply with nano <filename>.
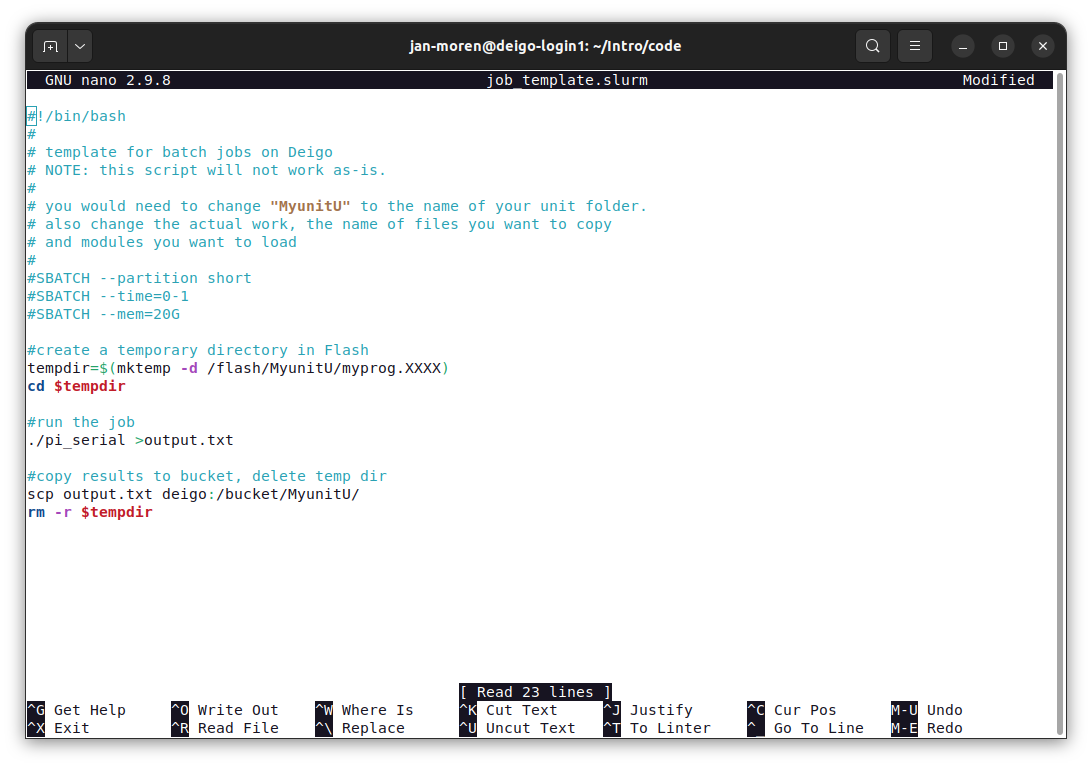
As you can see, you have the text at the top, and a row of commands at the bottom. The commands all use the ‘ctrl’ key and a second key: ‘^X’, for instance, means that you press the ‘ctrl’ key and ‘x’ together.
You cut a line with ^k and paste with ^u. If you want to select text more precisely, press ^6, move the selection, then press ^k to cut and ^u to paste. You can get a list of commands and explanations with ^g.
Nano is very easy to use and good for quick edits. But it lacks a lot of basic things. For actual programming or other longer editing, you should eventually learn a more advanced editor.
gedit
Gedit is a graphical editor. It has all the features you expect, such as mouse support, syntax highlighting, file browser, smart indentation and parenthesis matching, a plugin system and so on. It is easy to use for beginners, and good enough for fairly serious editing. Here’s a screenshot:
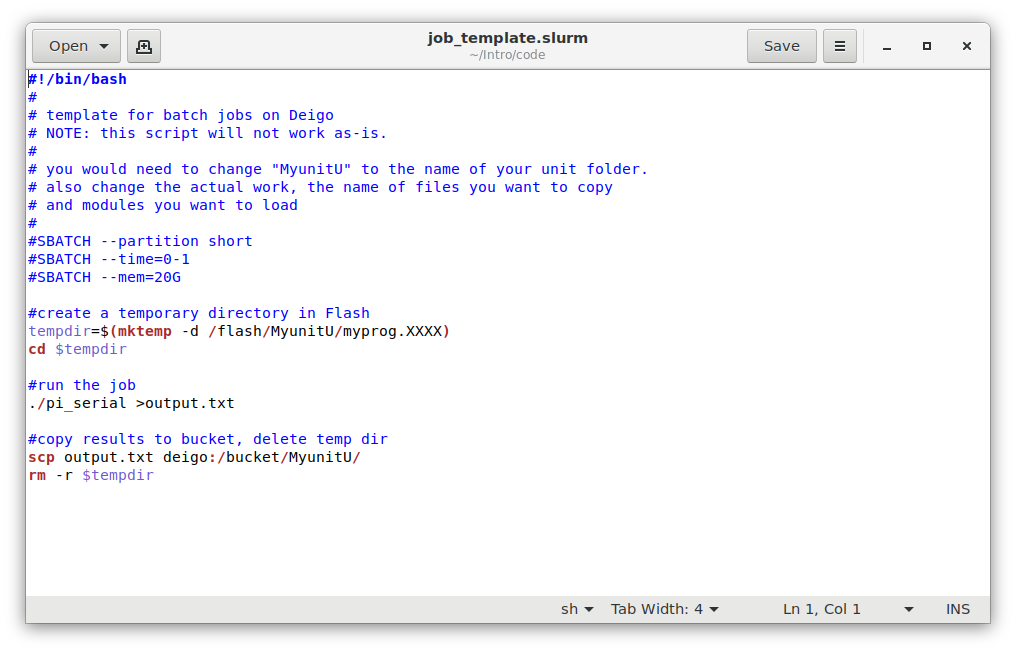
The main drawback of gedit is that it is a graphical editor. It has to send the window display across the network to your local machine, and your mouse moves and key presses back. Inside OIST this works fine. But if you connect from home you may find it annoyingly slow, and if you connect from elsewhere in the world it will be unusable.
Vim
Vim is perhaps the most popular single editor in the world among programmers and IT professionals. But it’s not very inviting or easy to use, and it will be very intimidating to beginners.

We don’t have the space to cover Vim here. You can run the vimtutor program in the terminal to start an interactive tutorial. It will walk you through the basics of using the editor.
You can also search online for lots of excellent tutorials (Here is one tutorial), and there are many books and other resources available as well. It takes some effort to master it, but if you do a lot of editing or programming, it is well worth learning.
VScode
You need an editor on your own laptop or desktop computer as well. All operating systems come with one or more editors (Vim and Gedit above both often come with Linux), but if you are looking for a good, solid editor for programming and scripting we suggest VScode.
VScode is a popular programmers editor developed by Microsoft and released for free (and mostly open source — look for "vscodium" for a purely open source package) for Windows, OSX and Linux.
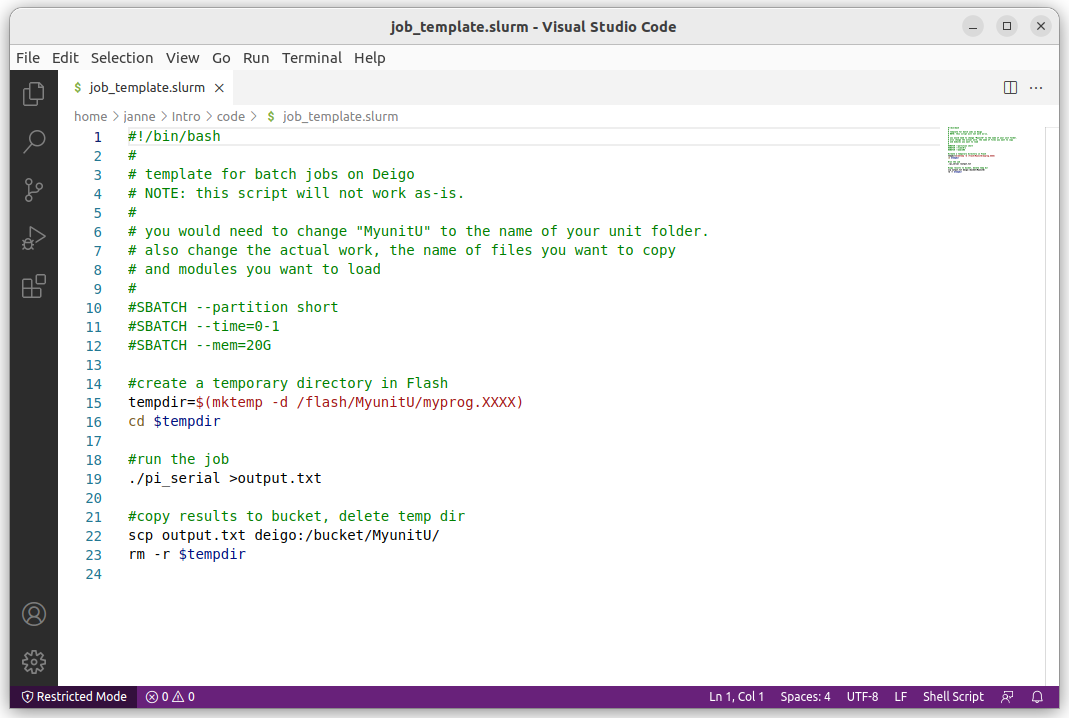
It is fairly advanced, with an extensive plugin system and support for many languages, debugging and other features.
We don't have it installed on the clusters (it would be a bit painful to use remotely), but it does have a remote editing option that lets you edit files on the cluster using the local editor — it's really using ssh in the background. Just be aware that it's not perfect, and sometimes it will leave behind running scripts on the login nodes. Please make sure to clean that out if you do use this functionality.
Summary
Here’s a quick summary of the commands we’ve looked at so far:
-
man <command>show a manual page describing the command. -
apropos <something>Search the manual pages for “something”. -
ls <directory>list the files in a directory. use-lfor long format, and-ato see all files. -
cd <directory>go to a new directory. With no directory we go back home. -
cp <from>... <to>copy one or more files to a destination file or directory. With one file the destination can be a file. With more than one file the destination must be a directory. Use “-r” to copy a whole directory. -
mv <from>... <to>move one or more files. Also used to rename files. -
mkdir <directory>create a new directory. With the “-p” option, it will create all the parent directories as well if they don’t already exist. -
rm <target>Delete files, or, with the-roption, directories and their contents. -
cat <file>...outputs the lines from all files (or from standard in) in order to standard out. -
less <file>show a file or the output of a command in an easy to read format. Use arrow keys to move around, and/to search.qwill quit andhwill show you a help screen. -
sortsort the input.-nsorts numerically, not alphabetically.-rreverses the sorting order.-hwill sort human-readable values (it recognizes that “10.2M” is 10.2 megabytes for instance). Useful with commands such asdu. -
wccounts the characters, words and lines in the input.-lshows only the number of lines. -
echo <something>printsto the screen. -
grep "pattern"search lines in the input that match “pattern”.
More Commands and tips
-
“
head” shows the first lines in its input (10 by default). Similarly, “tail” shows the last lines. -
“
date” prints the current date and time. -
“
time” does not print the time. Instead it measures the time it takes to run a command:
$ time sleep 1
real    0m1.002s
user    0m0.000s
sys 0m0.002s
The “sleep” command waits for the specified time (one second here). “real” is the real time from start to finish. “user” is the amount of time the computer spent running the command itself. “sys” is time spent waiting for the disk or the network, printing to the screen and so on.
- "
history" lists your previously typed commands:
$ history
...
14963  ssh deigo-login3
14964  vim test.slurm
14965  man sbatch
14966  sbatch -h
14967  ll /apps/share/training/Intro/
This is very useful to remember something you did a little while ago. You can recall and rerun specific commands as well (search for "bash history" online for more).
Some common command patterns
Here’s some common command patterns. Some of them you’ve already seen in the example code earlier, some are new.
- pipe to “
less” to read things
# the "sbatch" command help is very long
$ sbatch -h|less
- use “
wc” to count things
# Let's count the number of lines with "castle" in Macbeth:
$ grep "castle" Macbeth.txt |wc -l
17
- find out how much data you have in your home with
duandsort
# find size of all files and directories in your home, and sorts them
$ du -ahc ~ |sort -h
This lists the size of all files and directories (-a), in a human readable format (-h), then sorts them with the largest at the bottom.
Conclusion
We can only cover so much in an introduction such as this one. The best way to learn all of this is not to read tutorials, but to log in and try to use this yourself.
An easy, low-risk way to do this is to try out all kinds of commands and things on a set of files you don’t need to care about. The Intro course example files we’ve used here are good for that. If you want to find out how the file permissions actually work in combination with directory permissions, for instance, try to set the permissions there and see what happens.
If you are ready to learn more, you can go on to our Advanced Bash page. Enjoy!