

Use Slurm
This site is discontinued.
Please go to SCDA-guide.oist.jp
You do not run programs directly on a cluster. Instead you use a scheduler to get access to a part of the cluster and run the program for you. At OIST we use the Slurm scheduler.
This is our introduction to using Slurm to run yuor programs. We explain the basic idea, and show you how to run programs interactively and scripted as batch jobs.
We have a second page, Advanced Slurm, that covers usage patterns such as running multiple jobs automatically or schedule jobs one after another. It also explains more about how Slurm actually works in the background.
Note: We follow the convention that what you type on the command line starts with '$'. You don't type the $ itself.
- Introduction
- Run Jobs on the Cluster
- Useful Batch Job Patterns
- Multithreaded batch jobs
- MPI batch jobs
- Array batch jobs (moved to the "Advanced Slurm" page)
- Final Notes and Advice
Our very brief introduction to Slurm
You log in to the cluster, load any modules you need, then use either 'srun' to start an interactive program, or 'sbatch' to start a batch (non-interactive) job. The 'srun' command looks like:
$ srun -p short -t 1:00:00 --mem=10G -c 8 --x11 --pty juliaThis would run the program "julia" on a compute node in the "short" partition,, using 8 cores and 10GB memory for up to one hour. "--x11" enables graphical applications, and "--pty" connects your keyboard input directly to the program. You can use the program interactively, but if you log out or lose the network connection, the program will get killed.
"sbatch" takes a shell script file that sets the Slurm parameters and runs the program as a batch job. Here's an example batch script:
#!/bin/bash
#SBATCH -p short
#SBATCH -t 1:00:00
#SBATCH --mem=10G
#SBATCH -c 8

module load ncbi-blast
blastp -in fastafile.fasta
The "#SBATCH" lines set the job parameters the same way as for srun: The "short" partition, 10GB memory and 8 cores for one hour. Everything after the #SBATCH lines is a regular bash shell script that, in this case, loads the ncbi-blast module, then runs the program "blastp" on a data file.
If this is saved as, say, "myscript.slurm", you can then run it with:
$ sbatch myscript.slurmThe job is submitted to Slurm. Slurm will queue it and start it once there are enough free resources. You don't need to stay logged in, and Slurm can email you when the job is done. But batch programs can't be interactive; they can't run a graphical UI, take no user input, and only sends output to a file.
Now, let's take a detailed look at how to use Slurm to run your jobs.
Introduction
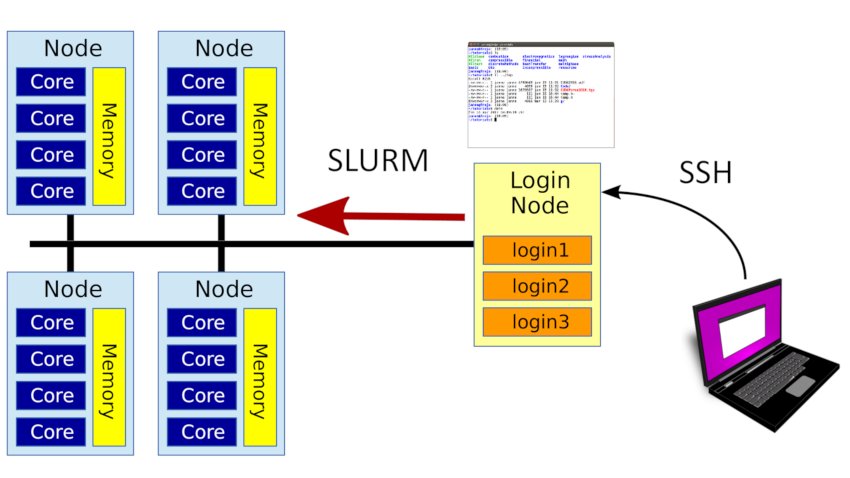
A cluster is a set of compute nodes and storage in a high-speed network. You log in to a special login node in the cluster. These are shared between many users, and you don't run computations there. Instead you want to use the compute nodes. The compute nodes have a set of resources, such as system memory, the CPU cores that does the computation, and special hardware such as GPUs.
Slurm is our scheduler and manages these resources. To run a program you first ask Slurm to give you access to the resources you need for a certain amount of time. This is called a job. Slurm will schedule your request and give you access once there are free resources for you to use.
Job priority
When there aren't enough resources for all jobs, some will have to wait. Jobs that need a lot of cores or memory, and for long time, will generally need to wait longer, simply because they need more free resources before they can run.
Slurm mainly takes the order of submission into account when it decides which job to run next, but it also looks at the recent history for you and your unit. If you have used the cluster a lot recently, you will have a lower priority than a user that rarely uses it. This prevents frequent users from crowding out others from the cluster.
Some terminology
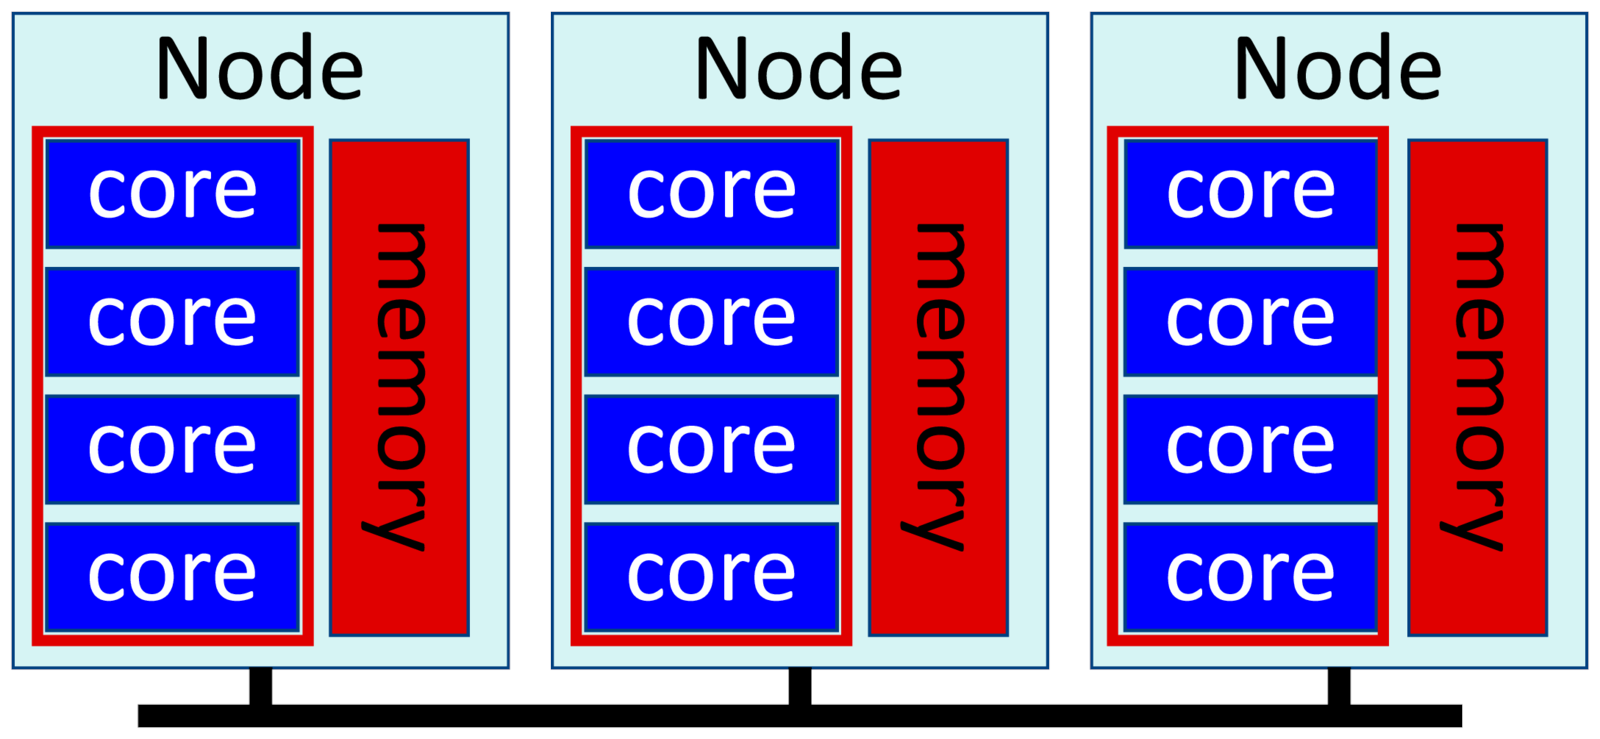
A cluster node is a single computer with its own CPUs, memory and storage. The CPUs have a number of cores that can each run one process. The cores in one node share the same memory. Cores in different nodes do not. Slurm often uses the name cpu for cores.
A partition is a group of nodes in a cluster that can be used together. They're grouped together by feature, so normal nodes are in one partition; nodes with a GPU have their own partition; large-memory nodes in yet another. This lets you select nodes by features that you need.
A job is a set of resources available for some specified time. A job step is running one program using those resources.
A serial application runs a single task - one process - on a single core in one node. A threaded application runs a single task that uses multiple cores in a node. A distributed application runs multiple tasks - independent processes - that communicate with each other, possibly across multiple nodes in the network.
You submit jobs to a specific partition, and ask for a specified amount of resources on that partition. You also specify the number of tasks you want to run, and the time you need.
| name | explanation |
|---|---|
| node | One compute system with CPUs, shared memory and local storage on a high-performance workstation. |
| core | A single computation unit. A part of a CPU, and capable of running one process or one thread. Modern CPUs have 2-36 cores. |
| cpu | For Slurm, same as a core. Note: not the same as a real, physical CPU. |
| process | A single running binary. Can have one or more threads. |
| task | for Slurm, same as a process. |
| thread | A single stream of execution. Runs on one core, belongs to a process. |
| job | One request for resources on a cluster. |
| partition | A group of nodes that can be used together. |
| resource | any hardware or software resource managed by Slurm, such as node, core, GPU and memory |
Run Jobs on the Cluster
There are two ways to run jobs on our clusters. We can run jobs directly with the 'srun' command. It's great for short jobs or for interactive use, but for long-running jobs it's better to use the 'sbatch' command. With sbatch you can submit complicated jobs that run over many hours or days.
Both srun and sbatch starts jobs, and they share most options with each other. We'll start by looking at running jobs with srun, then we look at how to use sbatch.
Allocate Resources
We can tell slurm how many nodes we want to use, how many tasks — that is, processes — we want to run, and how many cores we want each task to have. Slurm will try to fulfil our request as best it can, while considering other waiting jobs, how busy the cluster is and so on.
Here is a selection of common options for srun and sbatch:
| Option | short | description |
|---|---|---|
| --ntasks | -n | Number of tasks or processes you wish to start. Each task uses at least one core. |
| --cpus-per-task | -c | number of cores each task will use |
| --nodes | -N | Minimum number of nodes. Each node needs to run at least one task. |
| --mem | Memory per node. Split among tasks on the same node. Shared between cores in a single task. | |
| --mem-per-cpu | Memory per core. Total allocated memory per task is this value mutliplied by the numer of cores. | |
| --time | -t | The amount of time you will need. |
| --partition | -p | The partition you wish to use. |
| --gres | Specifies special resources, such as GPU units, that you want to use on a node. | |
| --x11 | Allow applications to use graphics | |
| --pty | Run an interactive application | |
| --job-name | -J | Give the job a memorable name |
Cores and nodes
The main options you will use are "--ntasks" (short option form "-n") and "--cpus-per-task" ("-c"). ntasks tells Slurm how many tasks (also called "processes") you want to run. cpus-per-task sets the number of cores that each task will use. The cores for one task must all be on the same node, so Slurm will allocate enough nodes for you to to get the tasks and cores per task that you ask for.
You can explicitly set the number of nodes with the "--nodes" (or "-N") option. You can even give a range of nodes with --nodes=<min>,<max>.
Memory
You can ask for memory in one of two ways: "--mem" asks for memory per node. If you have more than one task on a node, the memory will be split between them. "--mem-per-cpu" asks for a certain amount of memory per core. If you ask for more than one core with --cpus-per-task your total memory on a node will be mem-per-cpu * cpus-per-task.
| Specification | allocated |
|---|---|
| - | 4 gigabytes is the defaut unless specified |
| 1 | 1 megabyte - no unit is read as megabytes |
| 500K | 500 kilobytes |
| 1M | 1 megabyte or 1024 KB |
| 1G | 1 gigabyte or 1024 MB |
| 1T | 1 terabyte or 1024 GB |
You specify the amount of memory as a number followed by a unit. So to allocate 2 gigabytes per node, you would say "--mem=2G", and to ask for 500 megabytes per core, you would say "--mem-per-cpu=500M".
Deigo has 512GB memory per node on the "short" and "compute" partitions. But note that this is the total memory. The local operating system and Slurm needs a bit of memory as well, so in practice you can allocate no more than 500GB for your job. See our page on resource limits for more.
Time
You specify the time you need with the --time (-t for short) option. The full specification has the form "days-hours:minutes:seconds". But you rarely need to write it out in full.
| Specification | allocated |
|---|---|
| - | By default you get 8 hours. |
| 10 | 10 minutes. |
| 10:00 | 10 minutes. Clearer to read. |
| 5:30:00 | 5 hours, 30 minute. |
| 3-12 | Three days, 12 hours. |
| 0-1 | One hour. |
| 1-6:30:00 | One day, 6 hours, 30 minutes. |
You can specify seconds, but the minimum time division is one minute so the seconds parameter is ignored.
Partitions and special resources
Our systems have multiple partitions. You pick one with "--partition" or "-p". Deigo has the "compute" and "short" partitions for general use; "largemem" for large-memory nodes and "bigmem" for the big memory node. For restricted partitions you need to ask for access on this page.
You can submit a job to more than one partition, but it will only run on one of them, whichever has free resoures. A job can not allocate resources on more than one partition.
For special resources on a node, such as GPUs, you also need to ask for access to one or more of them with the "--gres" option. You name the resourse and the number separated by a colon. You would run a job on the the Saion gpu partition and two GPUs with:
$ srun -p gpu --gres=gpu:2 ...
Interactive jobs with srun
You use "srun" to run interactive jobs. A few useful ways:
- Run quick tests of an application without having to write a script.
- Use interactive applications, including graphical ones, on the cluster.
- Start a new command line on a node and use as your own personal workstation.
srun is quick and easy, but there are a few drawbacks.
- If you log out or lose the connection to the cluster, your job will stop immediately.
- It's easy to mistype a parameter or command and have it fail.
- You have no later record on how you ran your job.
You run srun as: srun <slurm parameters> <program> <program parameters>. For example:
$ srun -t 10:00 --c 12 --mem=24G nest brainmodel.sliThis asks for ten minutes runtime, 12 cores and 24GB memory. Next comes the "nest" simulator program that we want to run, followed by its parameters (a model description file).
If it's just a quick 10 or 20-minute test then using srun like this works fine. But if your runtime extends into hours, you should probably use a script as detailed in the section on using sbatch.
Interactive and graphical programs
Use srun to run interactive and graphical programs on the cluster. We have two new parameters for this case:
-
"
--pty" tells Slurm to connect your keyboard and screen directly to the application, so that whatever you type goes directly to the program. -
"
--x11" tells Slurm to allow graphical applications. Note that you also need to use the-Xor-Yoptions when you log in with SSH. OSX and Windows users may need to take further steps to make graphics work locally. See our page on connecting to the cluster for details.
When you want to use the cluster interactively it's very convenient to start a new command line shell on a node. You can take a few cores and some memory in the morning and treat it as your own virtual high-performance workstation for the day:
$ srun -p short -t 0-8 -c 12 --mem=32G --x11 --pty bash
Example: Run R
Let's run a small interactive session with the R statistical package, using R. R has a set of predefined example data files, and we'll use the Nile data set. It contains the average flow of the Nile river for a range of years. Let's take a look:
$ srun -p compute -t 0-1 -c 8 --mem=16G --x11 --pty bashWe start an interactive job for one hour, with 8 cores and 10GB memory. Once we get a node we get a new shell prompt. Now we can treat this compute node like any computer (see our page on the module system for how to load applications):
$ module load R
$ R
…
> summary(Nile)
   Min. 1st Qu.  Median    Mean 3rd Qu.    Max.
  456.0   798.5   893.5   919.4  1032.0  1370.0
> scatter.smooth(Nile, col="blue", lpars=list(col="red", lwd=3))
We can run things interactively, and the --x11 parameter (together with the -X parameter for our ssh login) lets us run a graphical application, plot data and do other graphical tasks.
Manage Jobs and Find Information
There are several ways to control your jobs and find information about them.
squeue
The "squeue" command shows the queue of waiting and running jobs. It will show only your jobs, not that of any other users. Start a job (this one just sleeps for 30 seconds), then look at it with squeue:
$ srun -p short -t 5:00 -c 1 -n 1 sleep 30 &

$ squeue
      JOBID PARTITION     NAME     USER ST       TIME  NODES NODELIST(REASON)
     637797   compute    sleep jan-more  R       0:03      1 deigo011310
The default information shows you the job ID number, the partition, the job name, user (you), job state, time spent running, the numer of nodes and the nodelist (if running) or the reason it's not yet running (usually a lack of resources).
| Job state | meaning |
|---|---|
| PD | Pending. The job is waiting to run. |
| CF | Configuring. The job is being started. |
| R | Running. The job is currently running. |
| CG | Completing. The program itself has finished, but Slurm is still copying data and cleaning up. |
| CD | Completed. The job finished without issues. |
| F | Failed. The program ended with a failure return code. |
| TO | Timeout. The job ran out of time. |
With the "-t <state>" you see only jobs in a specific state, such as running (-t r) or waiting to run (-t pd).
You can customize the output almost any way you like using the -O option and a list of keywords:
$ squeue -O name,state:11,numcpus:8,numnodes:8,starttime
NAME        STATE      CPUS    NODES   START_TIME
sleep       RUNNING    4       1       2020-07-02T18:56:09
This lists the job name, the state, the number of cpus and nodes, and the start time. If it's scheduled but not yet running, the start time shows estimated time to start. The numbers set the amount of space for each column of output.
You can see all the other options and keywords in the online manual. Access it with "man squeue".
scancel
You use "scancel" to cancel waiting or running jobs. scancel <jobid> cancels job with ID
$ srun -p short -t 1:00 -c 1 -n 1 -J myjob sleep 1m &

$ squeue -u your-name
      JOBID PARTITION     NAME     USER ST
     637797   short      myjob jan-more  R

$ scancel 637797
You can cancel jobs in many ways:
$ scancel -n myjob          # Cancel all jobs with name 'myjob'
$ scancel -t pd             # Cancel all your pending jobs
$ scancel -u your-name      # Cancel all your jobs
You can combine these options in almost any way you like. Find out more with "man scancel".
sinfo
"sinfo" shows us the state of the cluster:
$ sinfo
PARTITION AVAIL  TIMELIMIT  NODES  STATE NODELIST
short        up   0-12:00:00   26 drain* deigo[010907,010927,010933,010936,
short        up   0-12:00:00  264    mix deigo[011030-011036,011101-011134,
short        up   0-12:00:00   29  alloc deigo[012008-012036]
short        up   0-12:00:00  328   idle deigo[010901-010906,010908-010926,
compute      up   7-00:00:00    2 drain* deigo[020230,020333]
compute      up   7-00:00:00  123    mix deigo[020201-020210,020231-020236,
compute      up   7-00:00:00   19   idle deigo[020211-020229]
largemem     up   infinite     48   idle deigo[020601-020636,021701-021712]
datacp       up   3-00:00:00    4   idle deigo-mover[1-4]
The nodes that are in state down or drain are not accepting jobs. alloc or mix are running jobs, and idle are free for use. Use "$ sinfo -s" for a short-form summary:
$ sinfo -s
PARTITION AVAIL  TIMELIMIT   NODES(A/I/O/T) NODELIST
short        up   0-12:00:00 293/328/27/648 deigo[010901-010936,011001-011036,
compute      up   7-00:00:00   123/19/2/144 deigo[020201-020236,020301-020336,
largemem     up   7-00:00:00      0/48/0/48 deigo[020601-020636,021701-021712]
datacp       up   3-00:00:00        0/4/0/4 deigo-mover[1-4]
The list of nodes for each partition is, in turn, allocated, idle, other (not available) and total nodes. As with other information commands, you can customize the output any way you like. See the manpage for sinfo for much more.
Ruse
It can be difficult to know how much time, how many cores and how much memory you actually need to allocate for a job. "ruse" is a small utility that helps you find out. Ruse is a module, so you load it like this:
$ module load ruseYou let ruse run your application, and it will measure the memory you use every 30 seconds. Once the job is finished, ruse will create a file with the total time and the maximum memory used. As an example, measure the memory use of "sleep 60":
$ ruse sleep 60Or, for an interactive job with srun:
$ srun -p short -t 2:00 -c 1 --mem 10G ruse sleep 60It produces a file "sleep-<process id>.ruse" with the time taken in seconds, and the maximum memory used. As sleep spends its time sleeping, it never used any process time:
Time:           00:01:00
Memory:         0.8 MB
Cores:          40
Total_procs:     1
Active_procs:    0
Proc(%):
Ruse is made for long-running compute jobs, so it measures the memory and processes only once every 10 seconds. But there are options to change the time interval; log memory use over time; print the output to the screen instead of to a file and others. See our Ruse documentation page for more.
HighSci
HighSci is our web portal to the clusters. You will find lots of useful information on your jobs; your storage use; the state of Deigo and other clusters and more, in an easy to read format. Find your own page at highsci.oist.jp.
Batch Jobs
The best way to run jobs is as batch jobs. It is very similar to running with srun, but instead of putting job options and the program to run on the command line, you create a text file — a script — that sets the Slurm options and lists the commands you want to run.
Let's look at this simple srun command that just waits for thirty seconds:
$ srun -p short -t 1:00 --mem=10M -c 1 -n 1 sleep 30We ask for 1 minute, 10 megabytes memory, one core and one task. Here is the same job as a Slurm batch script:
#!/bin/bash

#SBATCH -p short
#SBATCH -t 1:00
#SBATCH --mem=10m
#SBATCH -c 1
#SBATCH -n 1

sleep 30
Create a file "batch_example.slurm" (using the "nano" editor for example) with the above lines. Then run the batch job with sbatch:
$ sbatch batch_example.slurmA Slurm batch job has three parts. The very first line is "#!/bin/bash". This line tells the operating system that this is a shell script.
Next are lines beginning with "#SBATCH" followed by the job parameters. The parameters themselves are the same as for "srun". Slurm reads these lines when you submit the job with "sbatch".
After these lines come the bash shell commands that runs your application. This can contain anything you can put in a regular shell script or run on the command line directly. You can look up "bash" online for lots of good guides on using the shell and writing shell scripts.
Important: Never mix "#SBATCH" lines with regular shell script lines. the "#SBATCH" lines must all come before the first real script line or Slurm will ignore them.
When your job starts, the system runs this text file as a script on the first node you got allocated. The first line tells it to run this script using bash. Bash ignores the "#SBATCH" lines since anything beginning with "#" is a comment to bash. It runs the commands that come after those lines as if you had typed them on the command line.
Most Slurm parameters come in both a short and a long form. For instance, you can specify time with the short '-t' parameter, or with the long '--time=' parameter. The meaning is identical, but the short form is faster to type (so you'd use it on the command line) while the long form is clearer to read and understand in a script.
Batch job benefits
There are several good reasons to use a batch script rather than srun on the command line:
-
You can submit a batch job, then log out without having to wait for it to finish.
With
srunthe job is cancelled if you lose the connection. With batch jobs it will sit in the queue, then run and finish without your intervention. -
A script is more reliable than running a command line by hand.
You can resubmit the same job many times without the risk of forgetting or mistyping something. Scripts also form a handy collection of ideas that show you how to do things. Even if you forgot how to do some specific thing, the script will remember it for you.
-
A script is a record of your process.
Store a copy of your scripts along with the results that they produced. They form a record of exactly how you produced the data - what programs, what parameters and so on. Months or years from now you will almost certainly have fogrotten exactly how you generated the data. If you store the script with the data, you don't need to remember it.
Batch Job parameters
We have a few new parameters specifically for batch jobs.
| Option | short | description |
|---|---|---|
| --output | -o | File name for job output |
| --error | -r | File name for job errors |
| --mail-type | Send you an email for events | |
| --mail-user | Your email address. |
Your batch jobs run unattended, so they no longer have a terminal to show their output. Instead the output is saved into a file. The default file name is "slurm-<job ID>.out". You can set a different output file name using "--output". In the name, you can use '%j' to insert the job ID number, and '%u' to insert your user name.
By default both the regular output and any errors go to the same output file. But if you set a separate error file using "--error" the errors will go into that file instead. You specify the file name in the same way as with --output.
For jobs that take hours or days it can be useful to get an email when it finishes or fails. "--mail-user" sets the email address the alert emails should be sent to. With "--mail-type" you can specify any combination of the following parameters:
| BEGIN | Your job has begun running |
| END | Your job finished normally |
| FAIL | Your job encountered a problem and stopped |
| ALL | All of the above |
Here's an example of how to use these options:
#SBATCH --job-name=Myjob
#SBATCH --output=Myjob-%j.out
#SBATCH --error=Myjob-%j.err
#SBATCH --mail-type=END,FAIL
#SBATCH --mail-user=your.email@oist.jp
Batch scripts
The script itself runs on a compute node, not on the login nodes. This means in particular that you can't use data stored under /bucket in your script, since bucket is not available in the cluster itself. You need to copy any data from bucket to /work before you submit the job script, and move any results back to bucket after the script ends.
You can add multiple commands to the batch script. You should, for instance, add any module commands and other preliminary set-up into the script itself. That makes it clear what needs to be done to run the job, and you won't have to remember to do it manually.
For example, run an R command as a batch job:
#!/bin/bash
#SBATCH --partition=short
#SBATCH --job-name=R_job
#SBATCH --output=R_%j.out
#SBATCH --time=00:01:00
#SBATCH --mem=25m
#SBATCH --ntasks=1
#SBATCH --cpus-per-task=1

module load R
echo “stats for 1e8 normal random values:”
Rscript -e “summary(rnorm(1e8,0,1))”
We first load the latest version of R, then print out a small headline; this will end up at the top of the output file. We then run a single-line R program (using "Rscript -e") that gives us summary stats for 100 million normal random samples.
If you run this script, you will get an output file "R_<someID>.out". This one takes a little while to run; you can check the progress with the "squeue" command, and see the content of the output file with less:
$ sbatch Rbatch.slurm
$ squeue
...
$ less R_<some ID>.out
You can override parameters in the job script on the command line. Let's say you wanted to run the R script above with eight cores rather than one. You could edit the script, or you could simply do:
$ sbatch --cpus-per-task=8 Rbatch.slurmThe value you specify on the command line takes priority over the value set in the script itself.
Efficient Resource Allocation
Slurm will do its best to fulfil your resource request. But if the cluster is busy it may not be possible to find enough available resources right away, and your job will have to wait until they are.
The more resources you ask for, the longer it will take for Slurm to release enough resources and run your job. If you make it easy for Slurm to schedule your job — by asking for less memory, shorter running time and fewer cores — your job is more likely to get scheduled early.
Also, you might ask for more resources than you realize. --mem-per-cpu allocates memory per core, but cores in a single task share all their memory. With multiple cores you may get a lot more memory than you thought. 16 tasks with 8 cores per task is 128 cores, and able to fit in a single AMD node on Deigo. But if you ask for, say, 8GB per core, each task gets a total of 64GB of memory — more than half the total usable memory per node (500G). You will need 16 nodes — one node per task — to run this job, not one.
Two special situations are worth mentioning: when you ask for all cores or all memory on a node. In both cases you are really asking for an entire node. In such cases you might as well ask for all the memory (in the first case) or all available cores (in the second). Your job will take the entire node anyway, so it makes no difference to the scheduling.
The four main job types
We have four common types of job that we may want to run. They all need different kind of resources, and we can allocate them in different ways.
Below we will show a hypothetical small partition with three nodes and four cores per node. This is just to make it easy to follow; the principles apply in the same way to the real clusters.
Single process, single thread
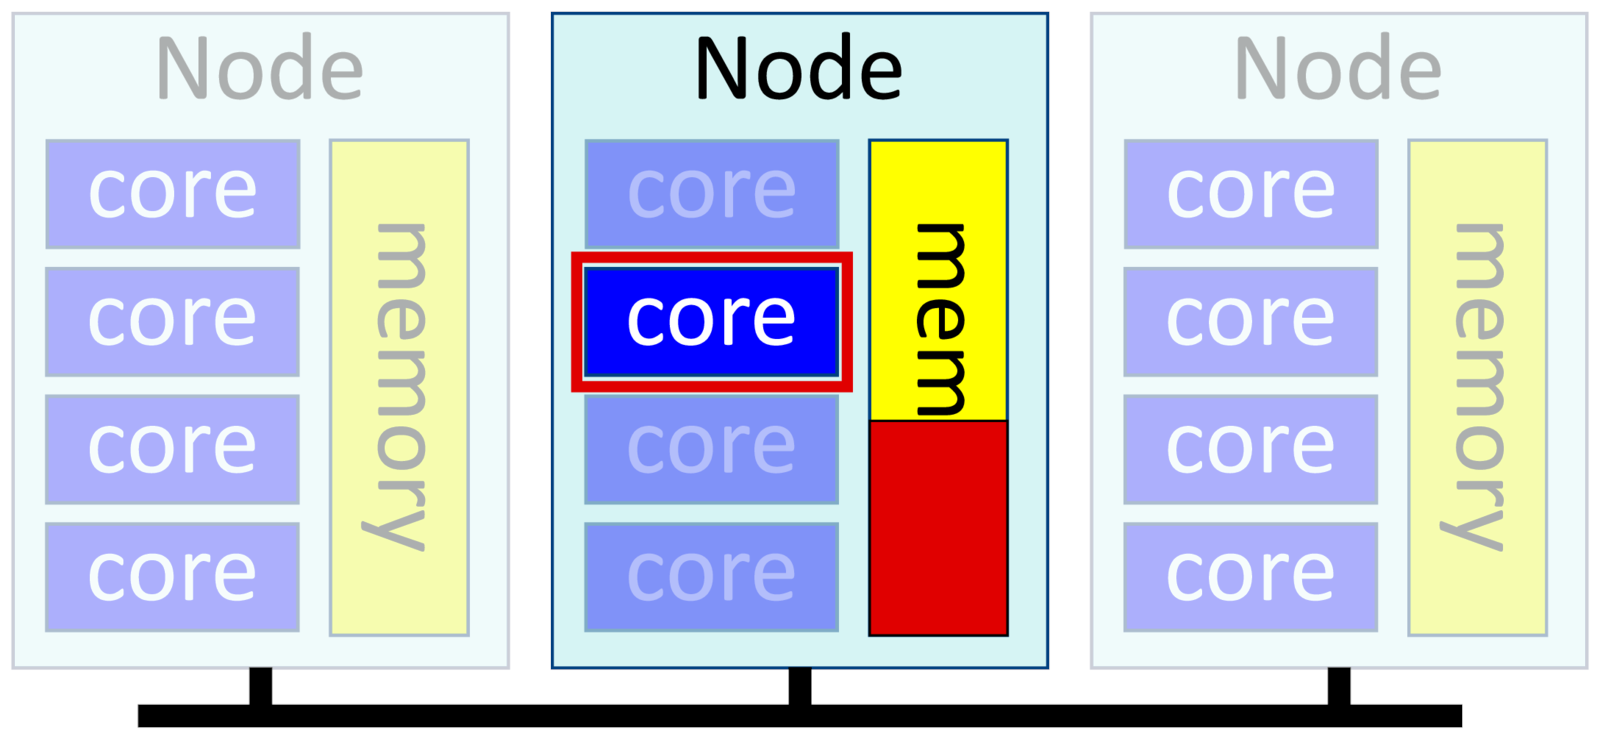
The simplest possible job is one that uses only a single core. This is also called a serial process. You ask for one task and one core per task, and get a single core on a node for you to use. If you give Slurm no options, this is the default.
-n 1, --ntasks=1
-c 1, --cpus-per-task=1
--mem=<X>
Example:
$ srun -p short -t 1:00 --mem=10G -c 1 -n 1 RExamples of single-threaded software include ordinary Python, Matlab or R scripts; post-processing scripts; some bioinformatics and genomics software that deesn't parallelize; and GPU-based software that rely on GPU accelerators for most of their work.
Single process, multiple threads
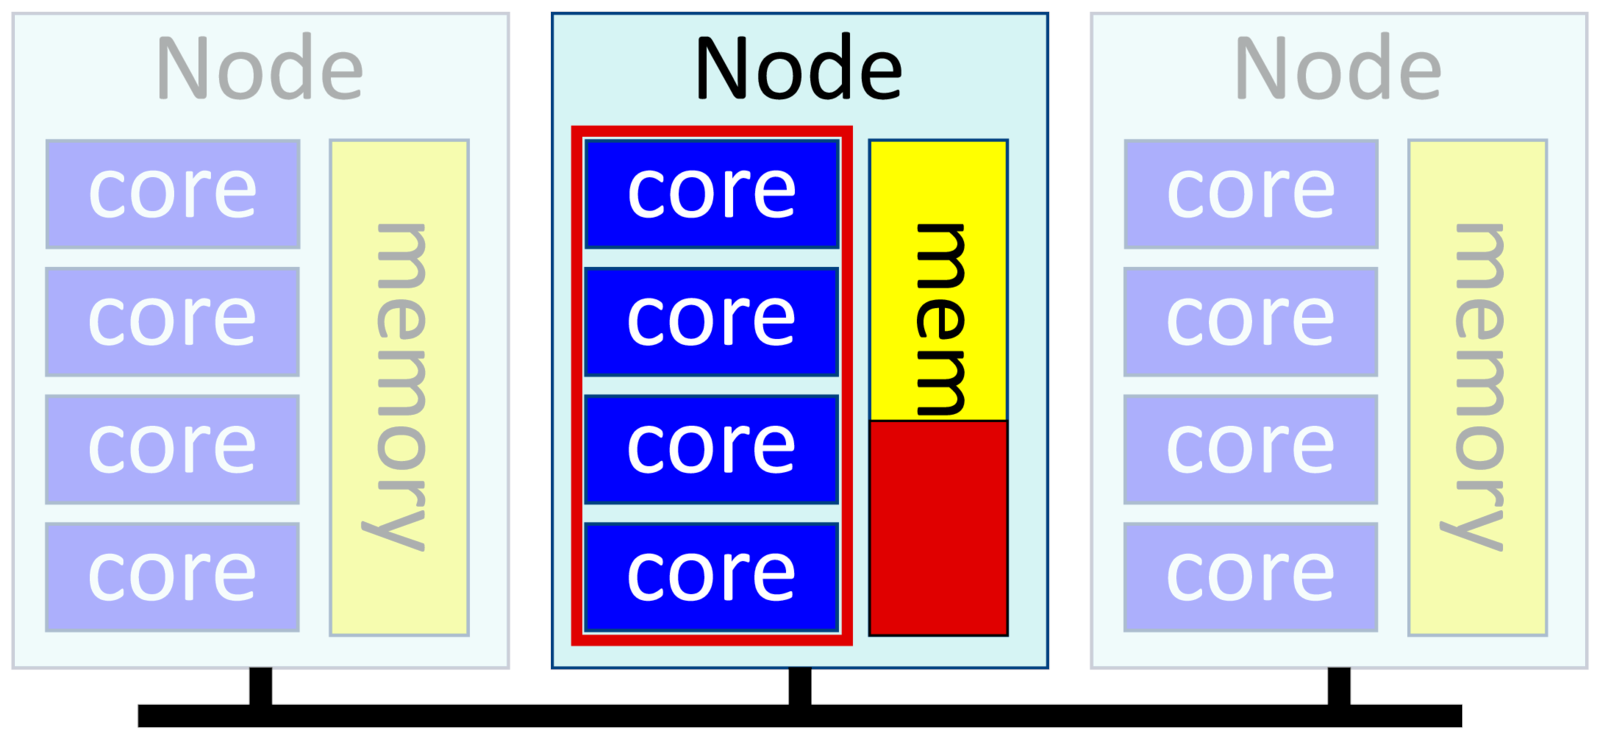
This is also called shared-memory or multithreaded software. You have a single binary that uses multiple cores. Threads run in parallel, with one thread per core, and share the same data in memory. As they share memory, the threads in a process have to all be on the same physical node.
You run multithreaded software by specifying one task and multiple "cpus", or cores, per task:
-n 1, --ntasks=1
-c <n>, --cpus-per-task=<n>
--mem=<X>
Example:
$ srun -p short -t 1:00 --mem=10G -c 4 -n 1 ipython3You can use up to 128 cores on Deigo AMD nodes, and 40 cores on the Intel nodes. The "--mem" parameter allocates memory per node. Since we have only one node (we have only one task), we're setting the total memory for our job.
All modern general-use CPUs have multiple cores, so a lot of software can take advantage of them. Also, mathematical libraries are often multithreaded, so even software that isn't directly written to be multithreaded can still benefit from multiple cores.
Python with Numpy and Matlab are good examples. Most of the software you want to use on the cluster can benefit from multiple threads.
However, be careful that you don't ask for more cores that you can use. In general there is a practical limit to how many cores a given application can effectively use. Make sure you test and measure to find out how many cores are effective for your job.
Multiple processes, single thread
Distributed applications run multiple processes that each work on one part of the problem. They occasionally synchronize with each other using messages, usually with a library called "MPI", and are also called MPI jobs. These messages can pass between nodes across a network, so these jobs can scale much larger than multithreaded software.
-n <m>, --ntasks=<m>
-c 1, --cpus-per-task=1
--mem-per-cpu=<X>
--mpi=pmix
Example:
$ srun -p short --mpi=pmix -t 1:00 --mem-per-cpu=10G -c 1 -n 4 exabayesWe tell Slurm that we want 4 tasks (or processes), and only one core per task. And we ask for "--mem-per-cpu" memory, not "--mem". --mem would allocate memory per node. If two of our tasks happened to share a node, they'd each get only half the allocated memory on the node. We need to ask for memory per core to avoid that.
To actually run an MPI job, you also need to use a parameter "--mpi=pmix". MPI processes need to be started with a special launcher that starts one process for each task, then makes sure the processes will find and connect to each other.
Instructions for MPI applications will tell you to use mpiexec, mpirun or another launcher to run your application. You can use these as well, but it's much better to leave this to Slurm, and use "--mpi=pmix" instead.
Also, please refer to the section on MPI batch jobs below for more on how to run these jobs in a script.
Multiple processes, Multiple threads
These are often called hybrid jobs, and consists of multiple MPI processes, one process per node; and each process uses multiple threads on that node. This is the most efficient way to run large-scale cluster jobs, and specialized high performance software such as OpenFOAM, NEST and so on usually take this approach.
Threads work together on the same data in memory, so they are usually more efficient than using multiple processes in a single node. But threads can't run across multiple nodes, whereas MPI can. The most efficient way to run a large job is to use threading within each node, then using MPI to communicate between the nodes.
Ideally you run one task or process per node, then use all cores on each node for your threads. We allocate memory per node, that is, per process, with "--mem". Remember that if we use all cores on a node, we might as well ask for all memory:
-n <n>, --nodes=<n>
-c <c>, --cpus-per-task=<c>
--mem=<m>
--mpi=pmix
Example (assuming 4 cores per node, like in the illustration above):
$ srun -p short --mpi=pmix -t 1:00 --mem=8G -c 4 -n 3 nest
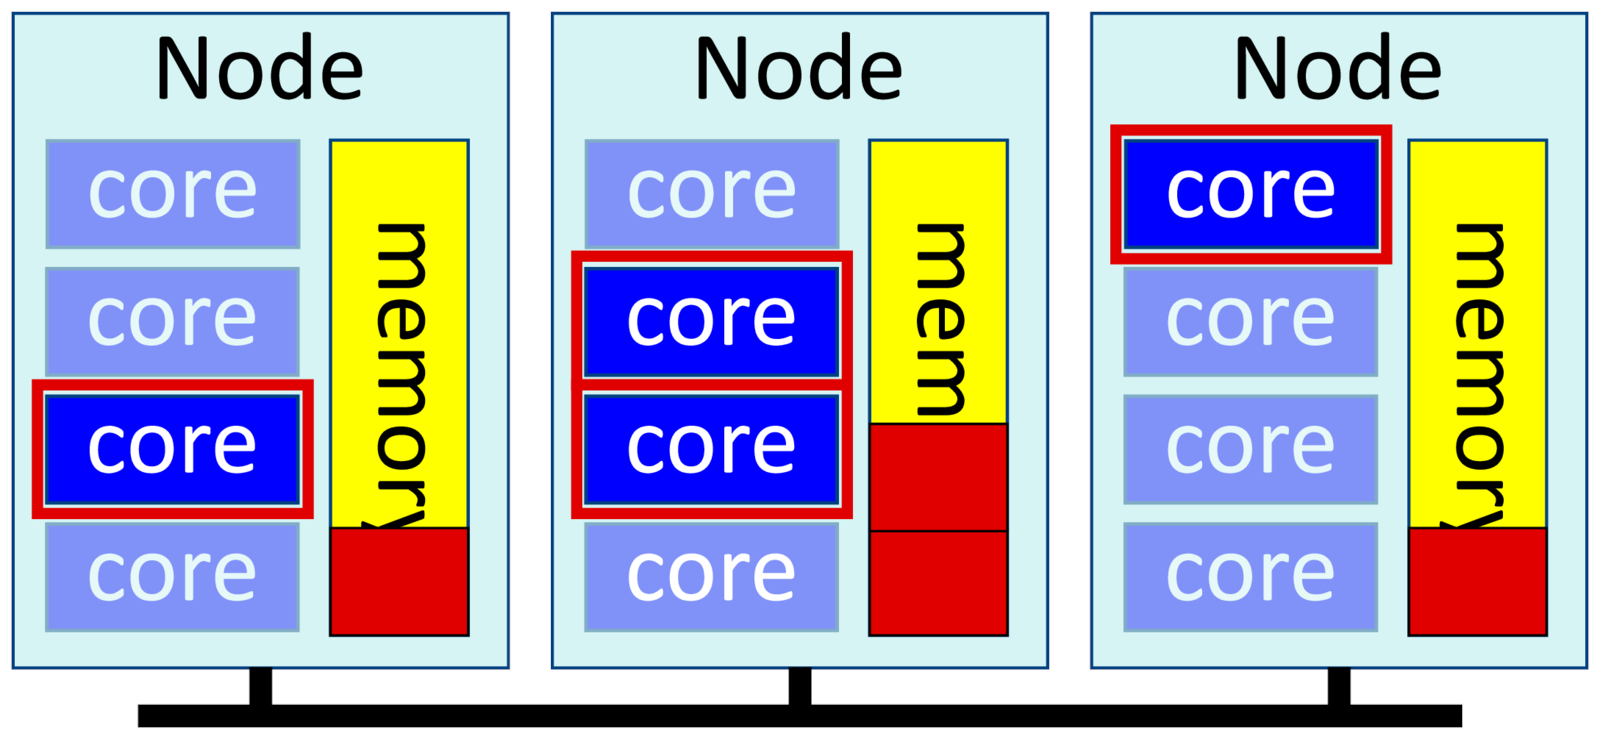
Reducing threads and increasing tasks
Using all threads on a node is very efficient. But it may take some time to get a set of completely free nodes when the cluster is crowded. A lot of software has a limit on how many threads they can use efficiently, and runs faster with fewer threads and more processes.
In such cases you should ask for only a quarter of the maximum number of cores in "--cpus-per-task' and increase the number of tasks in "--ntasks" instead. Then we let Slurm fit the processes onto nodes in the cluster as best it can.
Memory allocation becomes a bit more complicated. You can't directly specify the amount of memory per task in Slurm. Instead we set --mem-per-cpu to the amount we need per task or process, divided by the number of cores we ask for. If you need 50GB per process, and you run with 32 cores per process, you would ask for 50/32 = 1.56 ~= 2GB per core.
-n <n>, --ntasks=<n>
-c <c>, --cpus-per-task=<c>
--mem-per-cpu=<m>
--mpi=pmix
Example (assuming a maximum of 4 cores per node as above):
$ srun -p short --mpi=pmix -t 1:00 --mem=4G -c 2 -n 4 nestAlso, please refer to the section on MPI batch jobs below for more on how to run MPI jobs in a script.
Useful Batch Job Patterns
Here are some common and useful patterns for Slurm batch jobs.
Multithreaded Jobs
Running multithreaded or shared memory jobs as an sbatch script works very much like the direct multithreaded jobs we saw earlier. In batch scrpts, Slurm provides a shell variable called OMP_NUM_THREADS that contains the number of threads allocated to each task.
#!/bin/bash
#SBATCH --partition=short
#SBATCH --job-name=omp_job
#SBATCH --output=omp_%j.out
#SBATCH --time=00:01:00
#SBATCH --mem=25m
#SBATCH --ntasks=1
#SBATCH --cpus-per-task=8

echo “cores:” $OMP_NUM_THREADS
myprogram
MPI Batch Jobs
The sbatch script runs on a single node, and any program you start directly will use only that node. When you want to start processes on multiple nodes you need to launch them using "srun" inside your batch script (this is called a job step, though we don't cover job steps here).
In addition, MPI programs need to be launched in a special way so that the processes know where to find each other. With Slurm we do that with the "--mpi=pmi2" option to srun. Here's an example running an MPI application with 8 tasks:
#!/bin/bash
#SBATCH --partition=short
#SBATCH --job-name=exabayes
#SBATCH --output=exa_%j.out
#SBATCH --time=01:00:00
#SBATCH --mem-per-cpu=4G
#SBATCH --ntasks=8
#SBATCH --cpus-per-task=1

module load exabayes
srun --mpi=pmix exabayes
Note the launching line: "srun --mpi=pmix ....". Without it, it would not launch as an MPI job. Also note that it's pmix, not "mpix"; a common mistake.
Instructions will often tell you to use "mpirun" to run MPI programs. Usually you can simply replace "mpirun -np <n>" with the srun --mpi=pmix launcher line above. This will normally work better than the "mpirun" launcher. On rare occasions this may not work well. In those cases you can use the 'mpirun' command directly.
Array Batch Jobs
We have moved this section to the Advanced Slurm page, where we can give it a more in-depth explanation than we had here. Please go take a look!
Final Notes and Advice
Here's a collection of briefer usage notes and other information.
Cluster Partitions
The partitions on Deigo:
| Partition | Cores | Max Time | Restriction |
|---|---|---|---|
| short | 4000 | 2 hours | None |
| compute | 2000 | 4 days | None |
| largemem | 5 nodes | — | Application needed |
| bigmem | 8 | — | Application needed |
| largejob | 50 nodes | 2 days | PI Application needed |
On Saion:
| Partition | Nodes | Max Time | Restriction |
|---|---|---|---|
| test-gpu | 6*4GPUs | 8 hours | None |
| intel | 4 | — | None |
| gpu | 16*4 GPUs | 7 days | Application needed |
| largegpu | varies | varies | Application needed |
| prio-gpu | 1*4GPUs | 7 days | Application needed |
| Kofugaku | 8 | 24 hours | Application needed |
| powernv | 8*4GPUs | 7 days | Application needed |
You select a partition with the "--partition" option. For instance, to run a job on the "largemem" partition you add "#SBATCH --partition=largemem" to your Slurm script.
You need to apply for most partitions beforehand. Please come talk to us if you are interested in using any of the restricted partitions.
Slurm Environment Variables
Here is a useful subset of environment variables that Slurm sets in your script.
| Variable | Meaning |
|---|---|
SLURM_JOB_ID |
The job ID of the current job. |
SLURM_JOB_NAME |
The job name, or the name of the command if you don't set it. |
SLURM_SUBMIT_DIR |
The directory where you submitted the job. |
SLURM_CPUS_PER_TASK |
Number of cores per task. Not set if you don't use the -c or --cpus-per-task option. |
SLURM_NTASKS |
Number of tasks or processes in the job. The value you set with -n or --ntasks. |
SLURM_JOB_NUM_NODES |
The number of nodes you are using. Set with -N or --nodes |
SLURM_JOB_NODELIST |
A list of the nodes you have allocated for this job. |
SLURM_MEM_PER_CPU |
Same as --mem-per-cpu. Not set if the parameter is not set. |
SLURM_MEM_PER_NODE |
Same as --mem. Not set if the parameter is not set. |
SLURM_ARRAY_TASK_ID |
The index value of the currently running array job instance. |
SLURM_ARRAY_TASK_COUNT |
Total number of array jobs. |
SLURM_ARRAY_TASK_MIN |
First index number in the array job. |
SLURM_ARRAY_TASK_MAX |
Last index number in the array job. |
SLURM_ARRAY_TASK_STEP |
array job index step size. |
Final advice
Run All Jobs on the compute nodes, using srun and sbatch. This includes running Matlab, iPython notebooks or any other computing or data analysis. Don't run them on the login nodes.
Use the login nodes only for editing files, building applications and that sort of thing. There are many users logged in on each login node, and any heavy work will have a bad impact on everybody.
Run All Jobs from the /flash filesystem, and read data directly from /bucket. It's big, very fast, and made for running jobs. The /home file system is too small for data sets or even large log files. /home is also very slow, so your job will run a lot slower than it needs to.
Always Specify the amount of memory and time you need. Use ruse to estimate the time and memory you need. Remember that the less resources you ask for, the faster your job will get scheduled.
Clean Up after your job is finished. Delete temporary files, log files and other things you don't need. They can quickly eat up the space your unit has on the cluster, and make it impossible for your other unit memebers to run jobs.
Don't Submit thousands of jobs all at once. It overwhelms the scheduler and can prevent other users from using the cluster. If you need to do this, please come by and talk with us first.